HTML Editor
A TagSpaces extension allowing editing of HTML documents.
Features
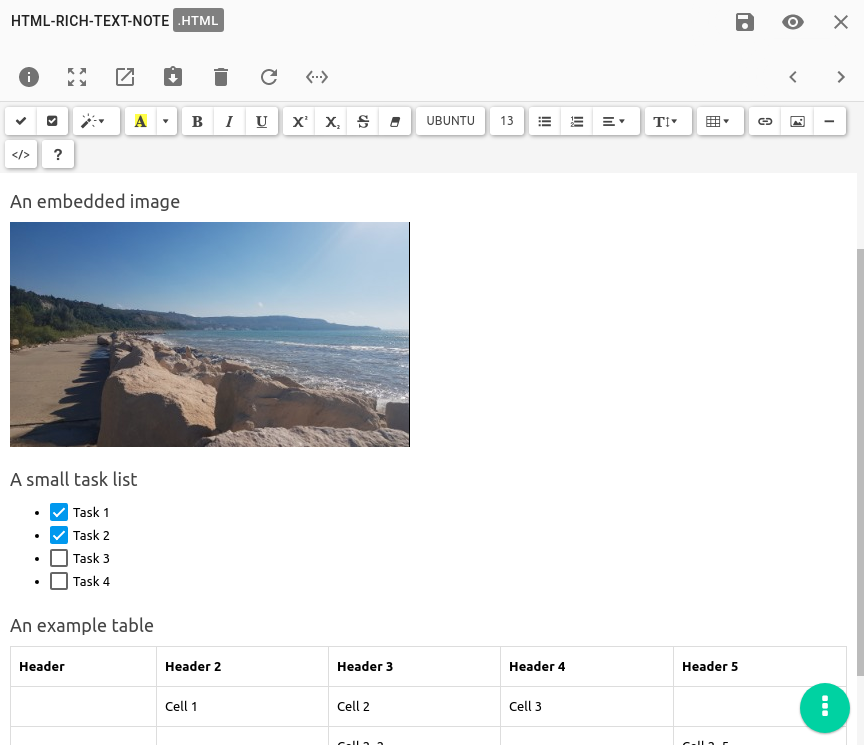
- The standard feature set of the Summernote JavaScript library.
- Content cleaning and sanitizing.
- Directly pasting images from the clipboard.
- Saving all the images as data URLs in one HTML file.
Used Libraries
This extension thankfully relies on the following great libraries:
- Summernote - a JavaScript library for HTML editing.
- Bootstrap
- i18next
- Dompurify
Installation
This extension is packaged with any new version of TagSpaces.
User Manual
HTML files are treated like RichText documents in TagSpaces. When you edit a .html document, the fully formatted preview of the file will be replaced by a WYSIWYG (What You See Is What You Get) HTML editor.
In editor mode, the HTML document will keep its formatting, but you are now able to edit the text, making the HTML editor behave like a RichText editor. On the top of the view, you will find a formatting toolbar, with which you can fully control the appearance of the document.
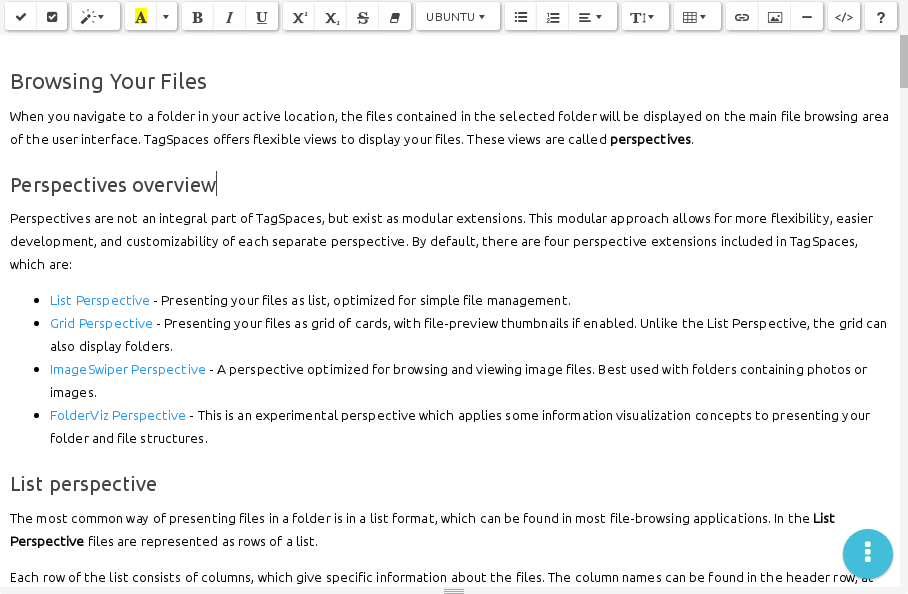
The formatting toolbar offers some common features you can find in any RichText or WYSIWYG HTML editor, with some features specific to TagSpaces. The overflow menu options from the HTML viewer are not implemented in the HTML Editor.
Toolbar Buttons
The toolbar buttons are grouped together based on similar behavior or functionality. The major groups are illustrated below:

- Manage Checkboxes (1)
- Paragraph Style (2)
- Color (3)
- Font Styles (4 and 5)
- Font Family (6)
- Lists and Alignment (7)
- Line Height (8)
- Insert Table (9)
- Insert Link, Image and Horizontal Ruler (10)
- Code View (11)
- Help (12)
Manage Checkboxes
This is a compound button, consisting of two parts:
- Add Checkbox (1)
- Toggle All Checkboxes (2)
Pressing Add Checkbox will insert an interactive, clickable checkbox into your document, which can be used to create, e.g., ToDo lists. To learn more about this feature, scroll down to the Creating ToDo Lists section.
Pressing the Toggle All Checkboxes button will select or deselect all the checkboxes present in the HTML document, regardless of their location.
When some checkboxes are manually selected, while others are deselected, the Toggle All Checkboxes will check all the unchecked ones. Pressing the button again will only uncheck the ones that have been checked via the button. The ones that were manually checked will remain unchanged.
Paragraph Style
This button will open a dropdown menu from which you can select a paragraph style to apply. When selecting an option, the chosen style will be applied to the entire current paragraph (where the cursor is located) without having to make a selection first. If you do select some text first, the style will only be applied to the current selection.
Available styles are:
- p represents the
<p>HTML tag (normal paragraph). It can also be used to remove other styles. The hotkeyCtrl+0is assigned to this action. - blockquote will enclose the current paragraph in
<blockquote>tags. - pre will enclose the current paragraph in
<pre>(preformatted text) tags. - H1 to H6 mean different heading levels from 1 (largest) to 6 (smallest). Selecting one of these options will enclose the entire paragraph in
<h1>to<h6>tags. HotkeysCtrl+1toCtrl+6can also be used to set headings, where the number reflects the level of the desired heading.
Color
This is a compound button, which has two parts.
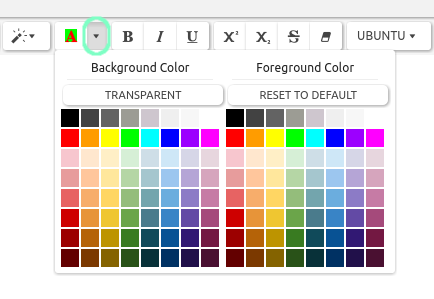
The left part, Recent Color, will apply the last used background and foreground color on the text. The applicable background and foreground colors are reflected on the button itself.
The right part, More Color, will open a dropdown menu, from which you can choose both background and foreground colors to apply, while the default color values can be reset with their respective buttons.
Font Styles
The following groups represent font styles that can be applied to either a selection or as a toggle, to mark any text to be written with the given style, until the toggle is switched off.
Bold (1), Italic (2), and Underline (3) will mark either the selected text or the text that follows as bold, italic, or underlined, respectively. These three buttons also have hotkeys assigned. Ctrl+b will toggle bold, Ctrl+i toggles italic, while Ctrl+u toggles underline.
Superscript (4) and Subscript (5) will mark either the selection or the text that follows to be superscript or subscript, respectively. Strikethrough (6) will create strikethrough text, and Remove Font Style (7) will remove all formatting. (This last option is only applicable to selections.)
From this group, only two options have hotkeys assigned. Strikethrough can be toggled with Ctrl+Shift+s, while the Remove Font Style hotkey is Ctrl+\.
Font Family
This is the last of the font style buttons. It can set the selection or the text that follows to a specific font family.
The options presented here might depend on your operating system and the fonts installed.
Lists and Alignment
This is a compound group, which offers different options that all work on the currently active paragraph as a toggle, without the need to make a selection first.
The first two buttons offer toggles for Unordered List (1) and Ordered List (2). The last button in the group will open a dropdown menu which offers four standard alignment options: Left (3), Center (4), Right (5), and Full Justify (6); and also the option to Decrease Indent (7) or Increase Indent (8).
The hotkeys for these operations are:
- Unordered List -
Ctrl+Shift+7 - Ordered List -
Ctrl+Shift+8 - Left Align -
Ctrl+Shift+L - Center Align -
Ctrl+Shift+E - Right Align -
Ctrl+Shift+R - Justify Full -
Ctrl+Shift+J - Decrease Indent -
Ctrl+Shift+Tab - Increase Indent -
Ctrl+Tab
Line Height
Offers a dropdown menu that allows you to set the line-height of either the active paragraph or the currently selected paragraphs between 1.0 and 3.0 by increments of 1.0, 1.2, 1.4, 1.5, 1.8, 2.0, and 3.0.
When you make a selection, you do not need to select the entire paragraph. The selection's edges will mark active paragraphs. The line height adjustment will be performed on all full paragraphs, starting with the one inside which the selection starts, and ending with the one inside which the selection ends.
Insert Table
This button will open a drop-down graphical menu for drawing a table grid, with a maximum size of 10x10, that can be easily inserted into the document.
Insert Link, Image, and Horizontal Ruler
This group has the following three buttons:
- Insert Link (1)
- Insert Image (2)
- Insert Horizontal Ruler (3)
Insert Link
The first button will open a dialog that allows you to add a hyperlink to the text. The dialog allows for specifying the text to display and the link to follow when clicked, with a checkbox allowing you to set the link to be opened in a new tab or window. The dialog can also be invoked by pressing Ctrl+K.
If you select some text to apply the link to before pressing the button, the selection will automatically populate the Text to display field. If you made no selection, you will need to specify a text to be displayed. If you leave the field empty and start typing a URL, it will automatically populate the text to display field, which you can later modify.
To edit or remove links, you can just click inside the link and use the buttons that appear on the popup.
The first button (1) will allow you to edit the link, while the second (2) will remove it.
Links can also be added to the documents by typing the URL and pressing enter. A well-formed URL will automatically turn into a link.
Insert Image
The second button in the group will also open a dialog, which lets you insert a picture from either your computer or from a URL.
Insert Horizontal Ruler
The last button will insert a simple horizontal ruler (a HTML <hr/> tag) at the point where the cursor is currently located. The hotkey to quickly insert a horizontal ruler is Ctrl+Enter.
This button does not respect paragraph endings. If you press this button in the middle of a paragraph, it will break the paragraph at that point.
Code View
This is a toggle to show plain HTML code on a dark background, where the formatting buttons are disabled, and you can edit the HTML code directly.
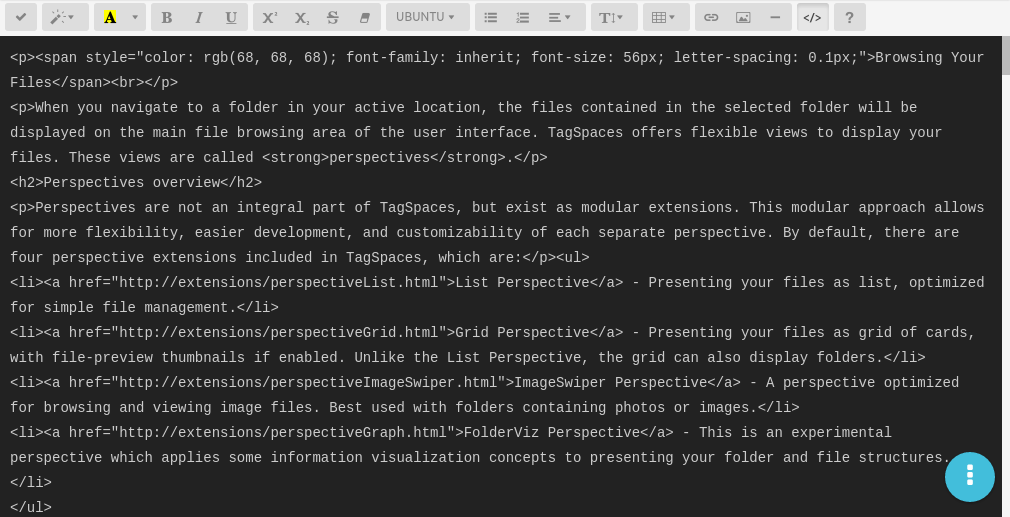
Pressing the button again will return to the WYSIWYG mode.
Code highlighting for the HTML view is not currently implemented.
Help
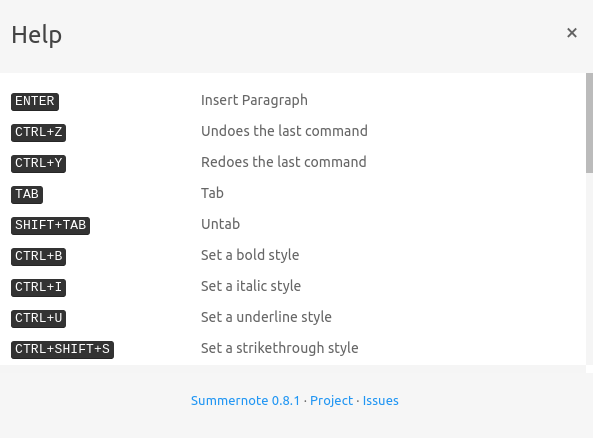
The last button will display a summary of all the keybindings. If you prefer to use hotkeys, you will find a quick reference here.
Creating ToDo Lists
The recently added feature of interactive checkboxes makes TagSpaces ideal for creating simple, yet flexible ToDo lists. Pressing the Add Checkbox Button button will insert a checkbox anywhere in the text.
For ToDo Lists, you would ideally want the checkbox to be the very first character of a list, although you are not limited by placement. To make your list multi-level (i.e. sub-items under list items), you can use the Increase Indent feature (see Toolbar Buttons -> Lists and Alignment) on the desired line, by either pressing its button or using its hotkey (Ctrl+Tab to increase indent, Ctrl+Shift+Tab to decrease indent).
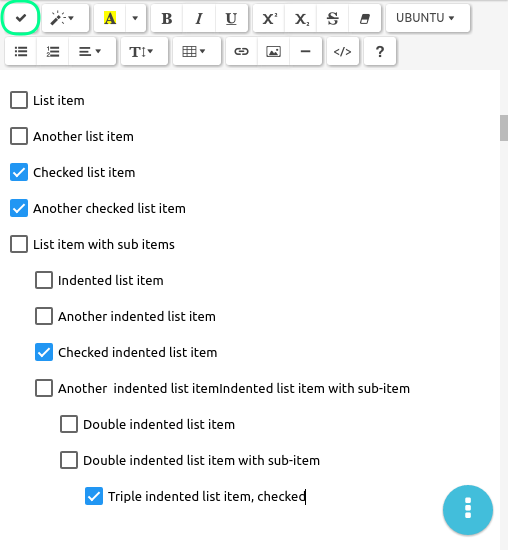
The interactive checkboxes only work in editor mode. When in HTML preview mode, you can see the current state of the box, but cannot change it. To make a list interactive, switch to editor mode by pressing the little pencil icon at the top of the preview.
Key bindings
Below you can find a summary of all the hotkeys you can use in the HTML Editor
Mac users should use the Cmd key, where Ctrl is mentioned
Ctrl+Z- Undo the last commandCtrl+Y- Redo the last commandTab- Insert TabShift+Tab- Remove tabCtrl+B- Set a bold styleCtrl+I- Set an italic styleCtrl+U- Set an underline styleCtrl+Shift+S- Set a strikethrough styleCtrl+\- Clear all stylesCtrl+Shift+L- Set left alignCtrl+Shift+E- Set center alignCtrl+Shift+R- Set right alignCtrl+Shift+J- Set full alignCtrl+Shift+7- Toggle unordered listCtrl+Shift+8- Toggle ordered listCtrl+Tab- Indent on current paragraphCtrl+Shift+Tab- Outdent on current paragraphCtrl+0- Change current paragraph's style to plain paragraph (<p>tag)Ctrl+1- Change current paragraph's style to H1Ctrl+2- Change current paragraph's style to H2Ctrl+3- Change current paragraph's style to H3Ctrl+4- Change current paragraph's style to H4Ctrl+5- Change current paragraph's style to H5Ctrl+6- Change current paragraph's style to H6Ctrl+Enter- Insert horizontal ruleCtrl+K- Show Link Dialog
Source code
The source code of this extension is freely available on GitHub.
Development
If you want to extend this extension, please follow our general extension development guide.
License
[MIT](https://github.com/tagspa ces/tagspaces-extensions/blob/main/html-editor/LICENSE.txt)