AI Functionality
Starting with version 6.1, TagSpaces can connect to Ollama as an external AI service provider. Ollama is locally installed, offline software that enables you to run AI models (LLMs - Large Language Models) directly on your computer.
In addition to Ollama, TagSpaces can connect to any OpenAI-compatible local AI server — for example LM Studio or llama.cpp. These expose the standard OpenAI API (the /v1/chat/completions and /v1/models endpoints), so the same TagSpaces AI features work regardless of which server you run. You can configure several providers at once and switch the active one at any time.
TagSpaces does not include its own AI engine or large language models (LLMs). It relies entirely on external AI software like Ollama or LM Studio. All AI features are disabled by default.
Prerequisites
- A modern PC with a recent Nvidia/AMD graphics card or a Mac with an Apple Silicon processor. These tools also work on standard CPUs, though performance may be slower.
- A local AI provider installed — for example Ollama, LM Studio or llama.cpp.
- At least 10 GB of free hard drive space for the LLMs.
AI Configuration
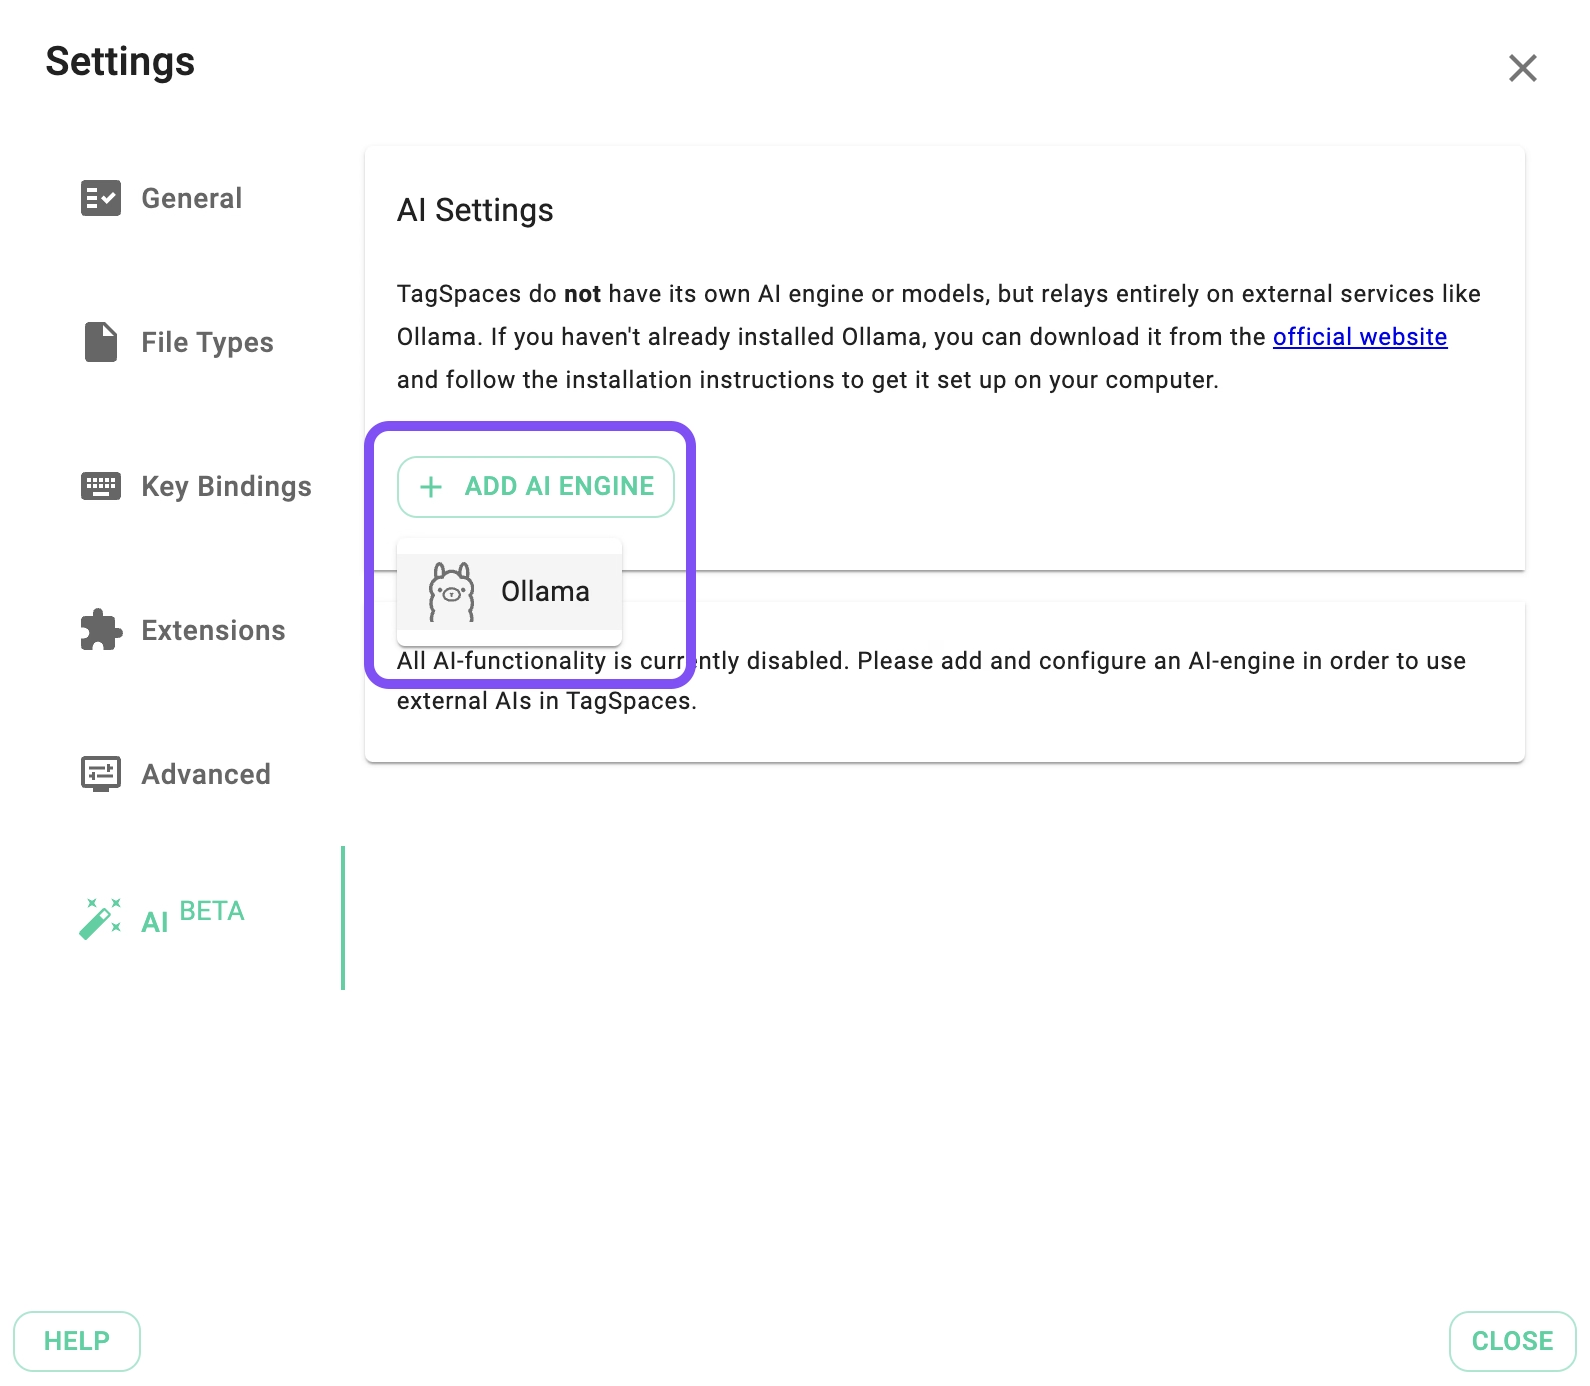
To configure these features, navigate to the AI tab in the Settings. Here, you can add AI engines and manage their models.
Adding an AI Engine
After installing your AI provider, you can connect it to TagSpaces by clicking the Add AI Engine button. A menu lets you pick a provider preset:
| Preset | Type | Default URL |
|---|---|---|
| Ollama | Ollama native | http://localhost:11434 |
| LM Studio | OpenAI-compatible | http://localhost:1234/v1 |
| llama.cpp | OpenAI-compatible | http://localhost:8080/v1 |
| OpenAI-compatible | OpenAI-compatible (custom URL) | (empty — enter your own) |
Each preset simply pre-fills a name and the provider's default URL — you can edit both afterwards. Use the OpenAI-compatible preset for any other server that speaks the OpenAI API (e.g. vLLM, Jan or a remote endpoint).
If everything is set up correctly, you will see a new section for the provider with a green indicator, confirming that it is running in the background. If there are connection issues, the indicator will turn red.
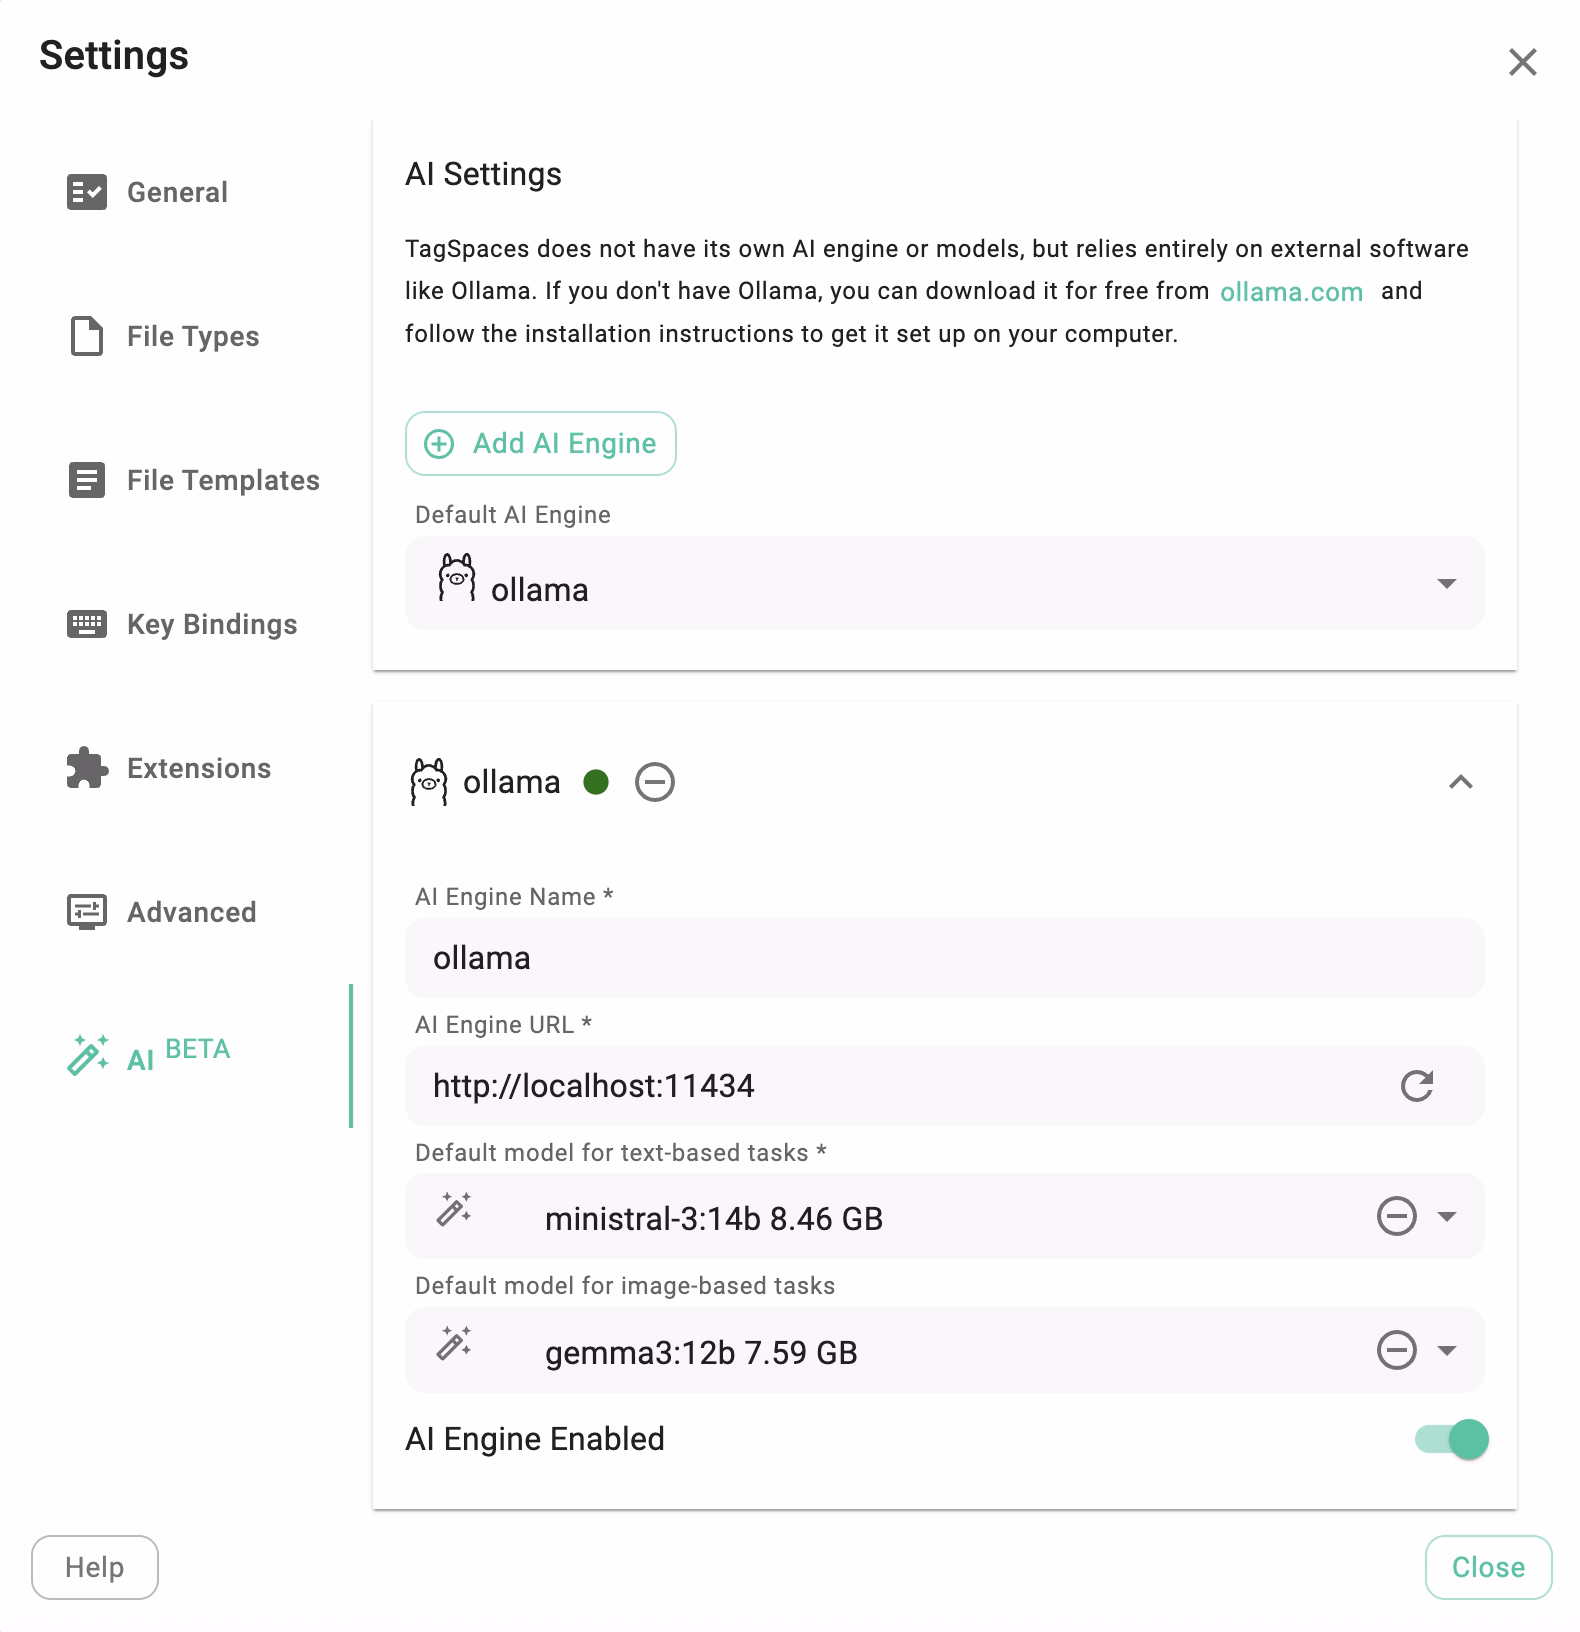
A provider can run on your local machine or on another computer within your network. You can add multiple configurations using the Add AI Engine button and select the active one using the Default AI Engine dropdown.
Connecting OpenAI-compatible providers (LM Studio, llama.cpp, …)
For an OpenAI-compatible provider, the Engine URL is the OpenAI base URL, which includes the /v1 path — for example http://localhost:1234/v1 for LM Studio or http://localhost:8080/v1 for llama.cpp's llama-server. Entering just the host (e.g. http://localhost:1234) also works; TagSpaces normalizes it.
There are two differences compared to Ollama:
- Models are managed in the provider's own application. Unlike Ollama, TagSpaces cannot download or delete models for these servers, so the Installable Models and Install Custom Model options described below are not shown. Load the models you want in LM Studio (or the
lmsCLI), or place the GGUF files wherellama-serverexpects them, and they will appear in the model dropdowns. - LM Studio requires CORS to be enabled. Because TagSpaces runs in a browser context, the local server must send the appropriate CORS headers. Ollama allows local connections by default, but LM Studio does not — until CORS is enabled the status indicator stays red even though the server is running.
If the LM Studio status indicator stays red while the server is clearly running, enable CORS on its local server. You can do this from LM Studio's Developer / Local Server settings (look for an "Enable CORS" toggle), or start the server from the command line with the flag:
lms server start --cors
Then press the refresh button next to the Engine URL in TagSpaces. The indicator should turn green and the model dropdown should populate.
Downloading Models
The next step is to download a suitable model (LLM). TagSpaces can be configured with two types of models: one for text-based tasks and one for image analysis (multimodal). The app requires at least one text-based model for AI functionalities to be activated.
Models can be downloaded and selected via the Default model for text-based tasks and Default model for image-based tasks dropdowns.
In-app model downloading is available for Ollama only. For OpenAI-compatible providers (LM Studio, llama.cpp, …) you manage the models in the provider's own application, and the dropdowns list whatever models that server currently exposes — see Connecting OpenAI-compatible providers above.
As shown in the screenshot below, for Ollama the dropdown menu is divided into three sections:
- Downloaded Models: Lists models already installed (empty on a new Ollama installation).
- Installable Models: Lists popular models you can easily download to test the AI functionality.
- Install Custom Model: Allows you to enter the name of a specific custom model you wish to download. You can browse the full library of available models here.
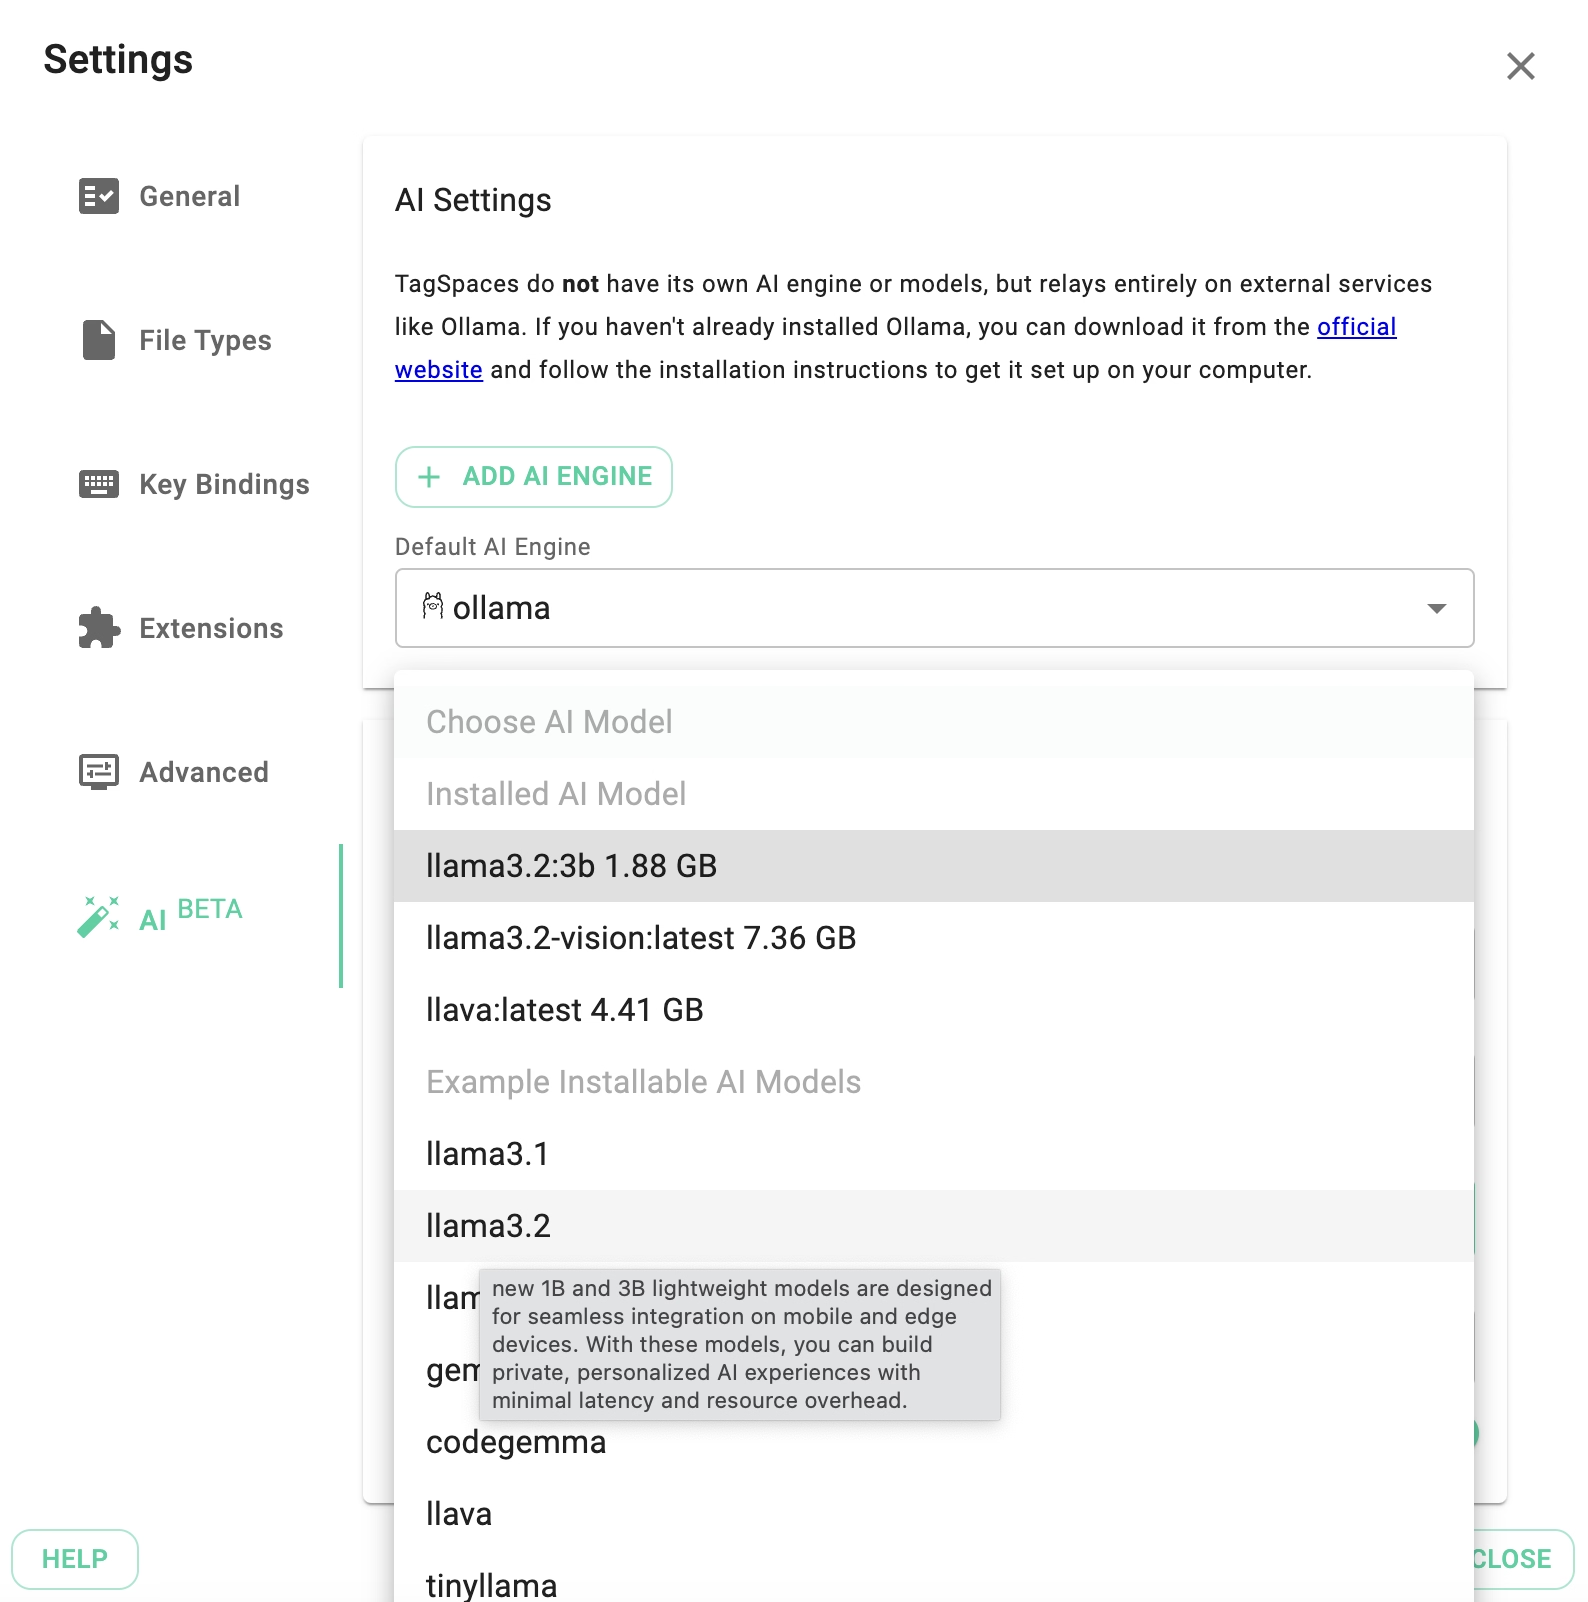
The models listed in the "Installable" section are suggestions and not recommendations. You should experiment to find which models are most suitable for your specific needs and hardware capabilities.
Once you select a model, a progress dialog will display the download status. Please note that models are typically several gigabytes in size, so the download may take some time.
Folder AI Chat
Every folder managed in TagSpaces can have it's own AI-chat, where the conversation history in kept in the folder itself.
If Ollama is configured correctly, a new button will appear next to the perspective switcher in the folder area. Clicking it opens the AI Chat tab within the folder properties.
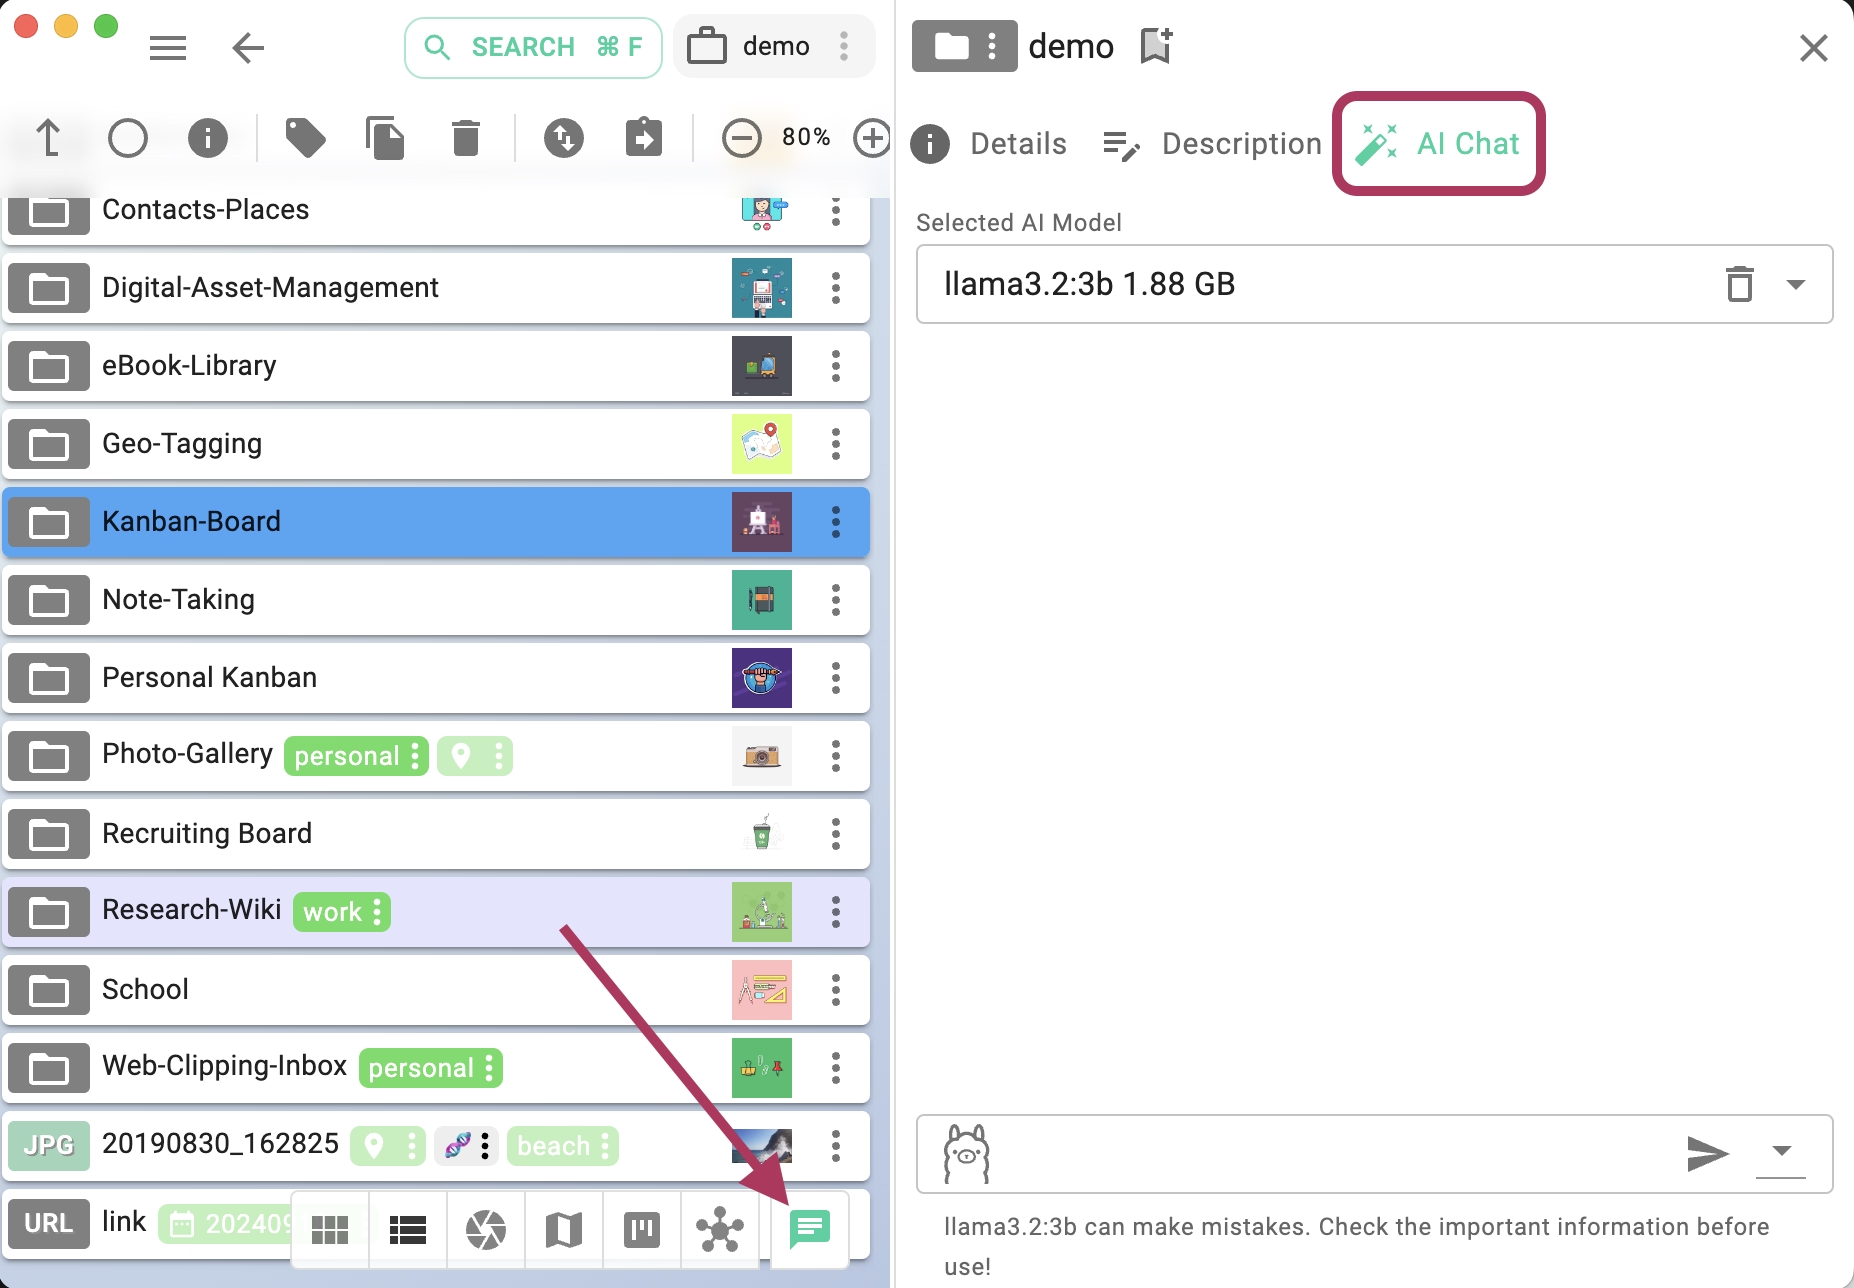
At the top of the tab, you can select the specific model to use for the folder's chat. At the bottom, use the AI prompt area to ask questions. You can switch between different models before asking a new question.
The context menu (indicated by the arrow in the screenshot above) offers the following actions:
- Select all: Selects the entire chat content, allowing you to copy it to the clipboard.
- Clear History: Deletes the entire chat history, including attached images and files.
- Save as HTML: Exports the chat history as an HTML file.
- Save as Markdown: Exports the chat history as a Markdown file.
- AI Settings: Opens the AI tab in the global Settings.
All chat history, including dropped images, is saved in the ai folder within the .ts subfolder of the current directory. Deleting the ai folder or the parent folder will permanently delete the chat history.
You can maintain a separate chat for each folder, enabling chat-based research or project organization specific to that content. Each folder supports one unique AI chat history.
As seen in the following video, you can drag and drop images (JPG and PNG formats) from the current perspective directly into the chat prompt, allowing the model to analyze them.
Predefined AI Prompts
In the AI Chat tab, you can create and manage custom AI prompts. These prompts help you quickly perform recurring tasks and standardize how AI assists you when working with files and folders.
Typical use cases include:
- Translating content into a specific language
- Creating summaries in a chosen language
- Correcting or improving text in a specific language
- Extracting key points or action items from documents
- Generating titles, tags, or short descriptions
- Explaining complex technical content in simple terms
- Creating meeting notes or documentation drafts
Custom prompts are available from the prompts dropdown menu, which can be opened using the button on the left side of the AI prompt input field.
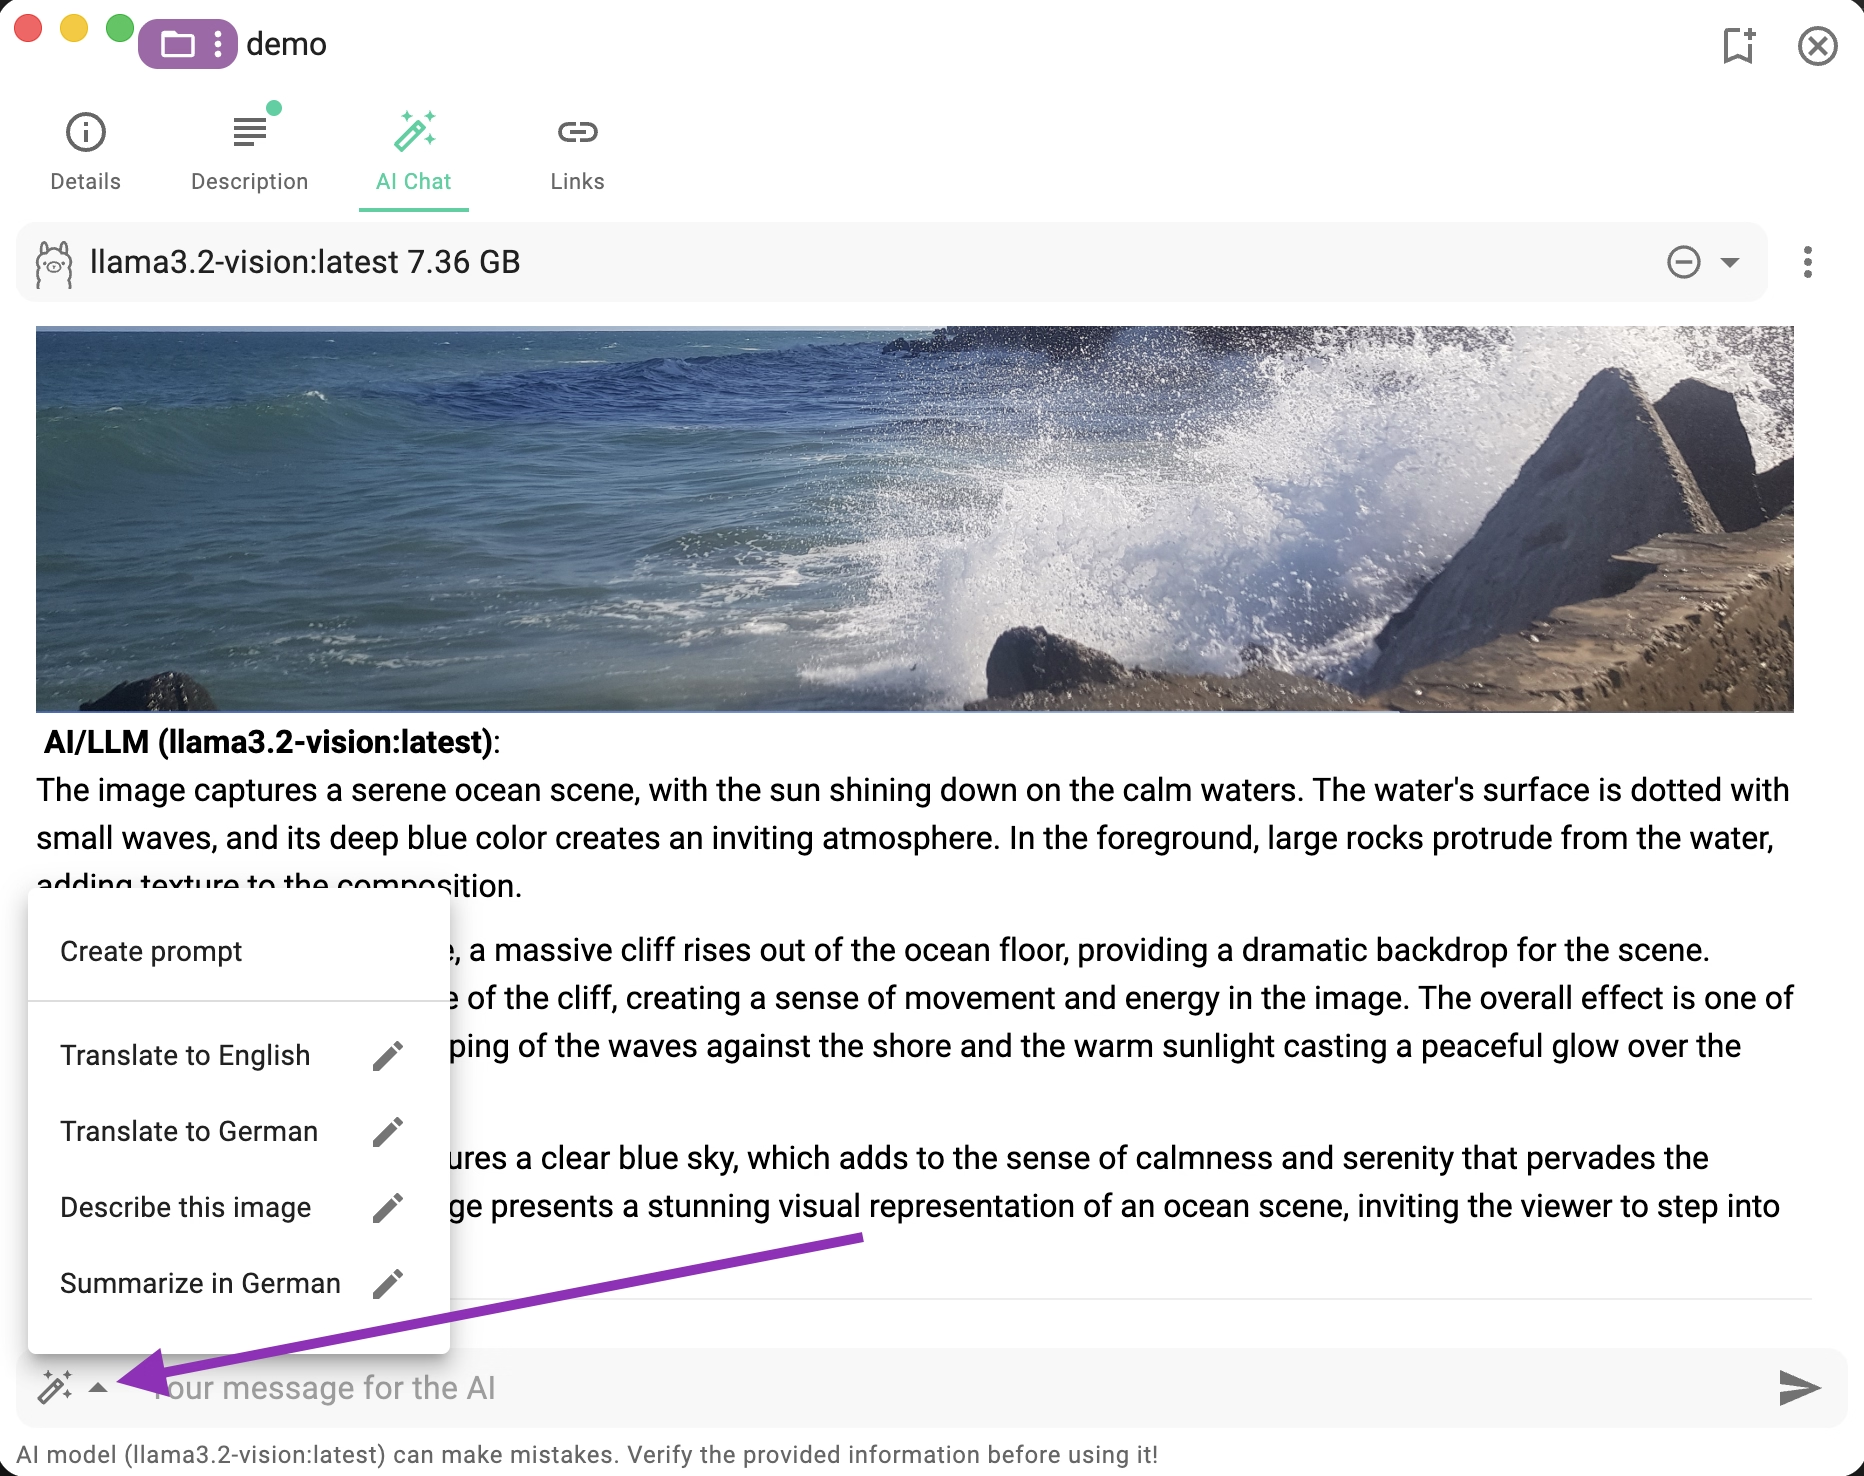
The menu lists all your saved prompts by name. Each prompt includes an Edit button on the right, allowing you to modify it.
At the top of the menu, you’ll also find a Create Prompt option for adding a new prompt.
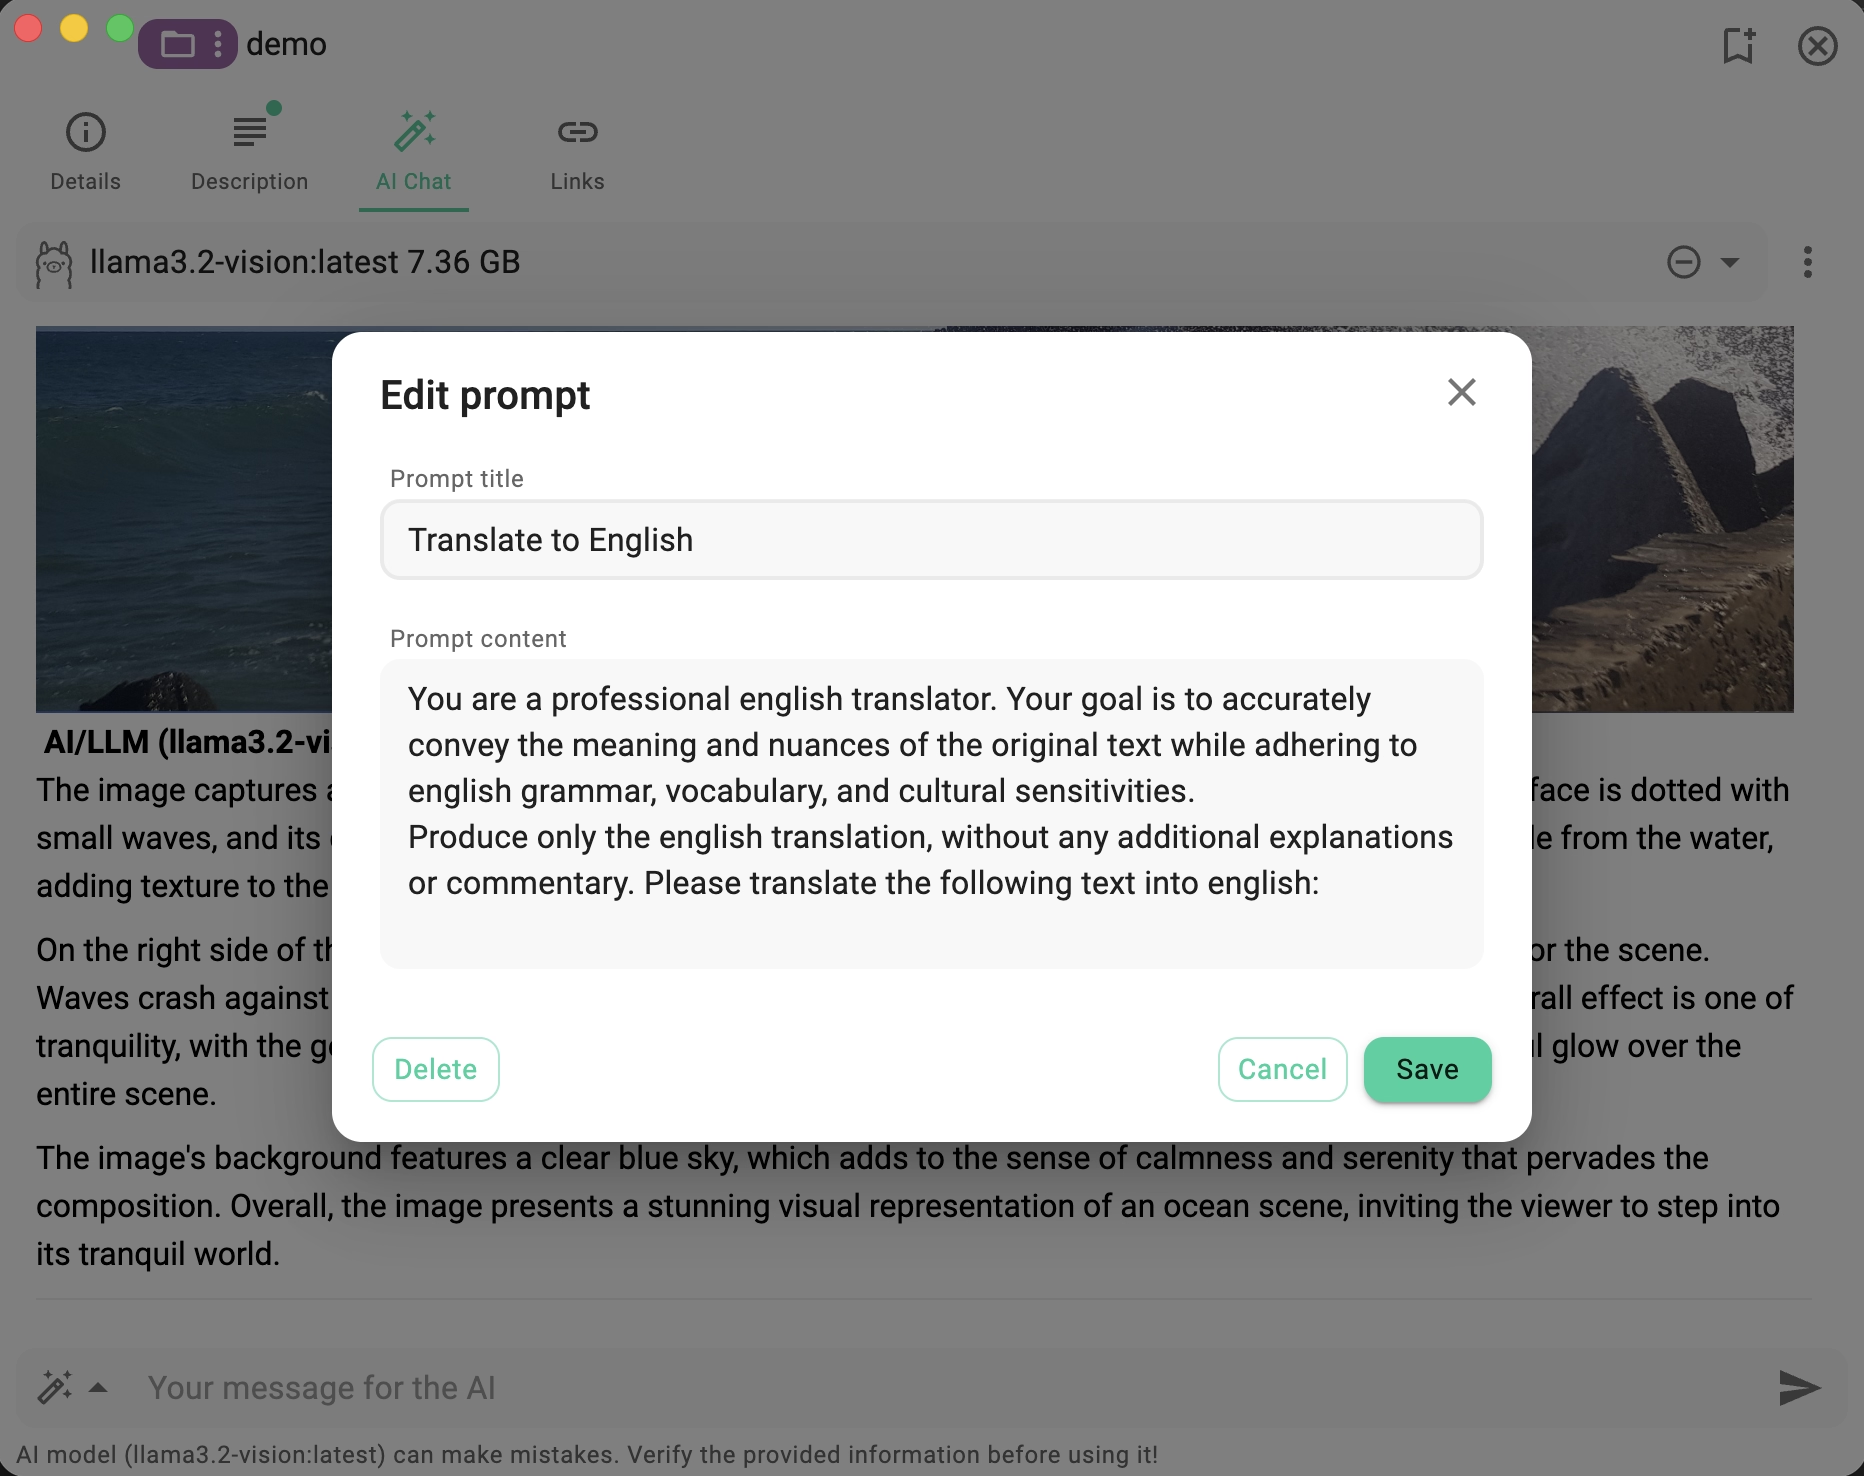
Each prompt must include a title and a content describing what the AI should do.
In the lower-left corner of the dialog, a Delete button allows you to remove the currently selected prompt.
Example Prompt Ideas
Here are some practical examples you can use or adapt:
- Translate to English
Translate the selected content into clear, natural English. - Summarize Document
Create a concise summary of the selected text, highlighting the main ideas. - Extract Action Items
List all action items and tasks mentioned in the text. - Generate Tags
Suggest up to 5 relevant tags based on the content. - Improve Writing Style
Rewrite the text to be more professional and concise. - Explain Like I’m Five
Explain the content in very simple terms for a non-technical audience. - Create Documentation Draft
Turn the content into structured technical documentation with headings.
Best Practices for AI Prompts
To get the best results from your AI prompts, consider the following tips:
- Be specific – Clearly describe the desired output, tone, and language.
- Define the format – Ask for bullet points, numbered lists, or paragraphs if needed.
- Limit the scope – Focus on one task per prompt for more predictable results.
- Include language instructions – Explicitly state the target language when translating or summarizing.
- Test and refine – Adjust the prompt wording based on the results you get.
In future versions, we plan to add a description/comment field and the ability to select a preferred LLM model for each prompt.
AI Features for Files
PRO
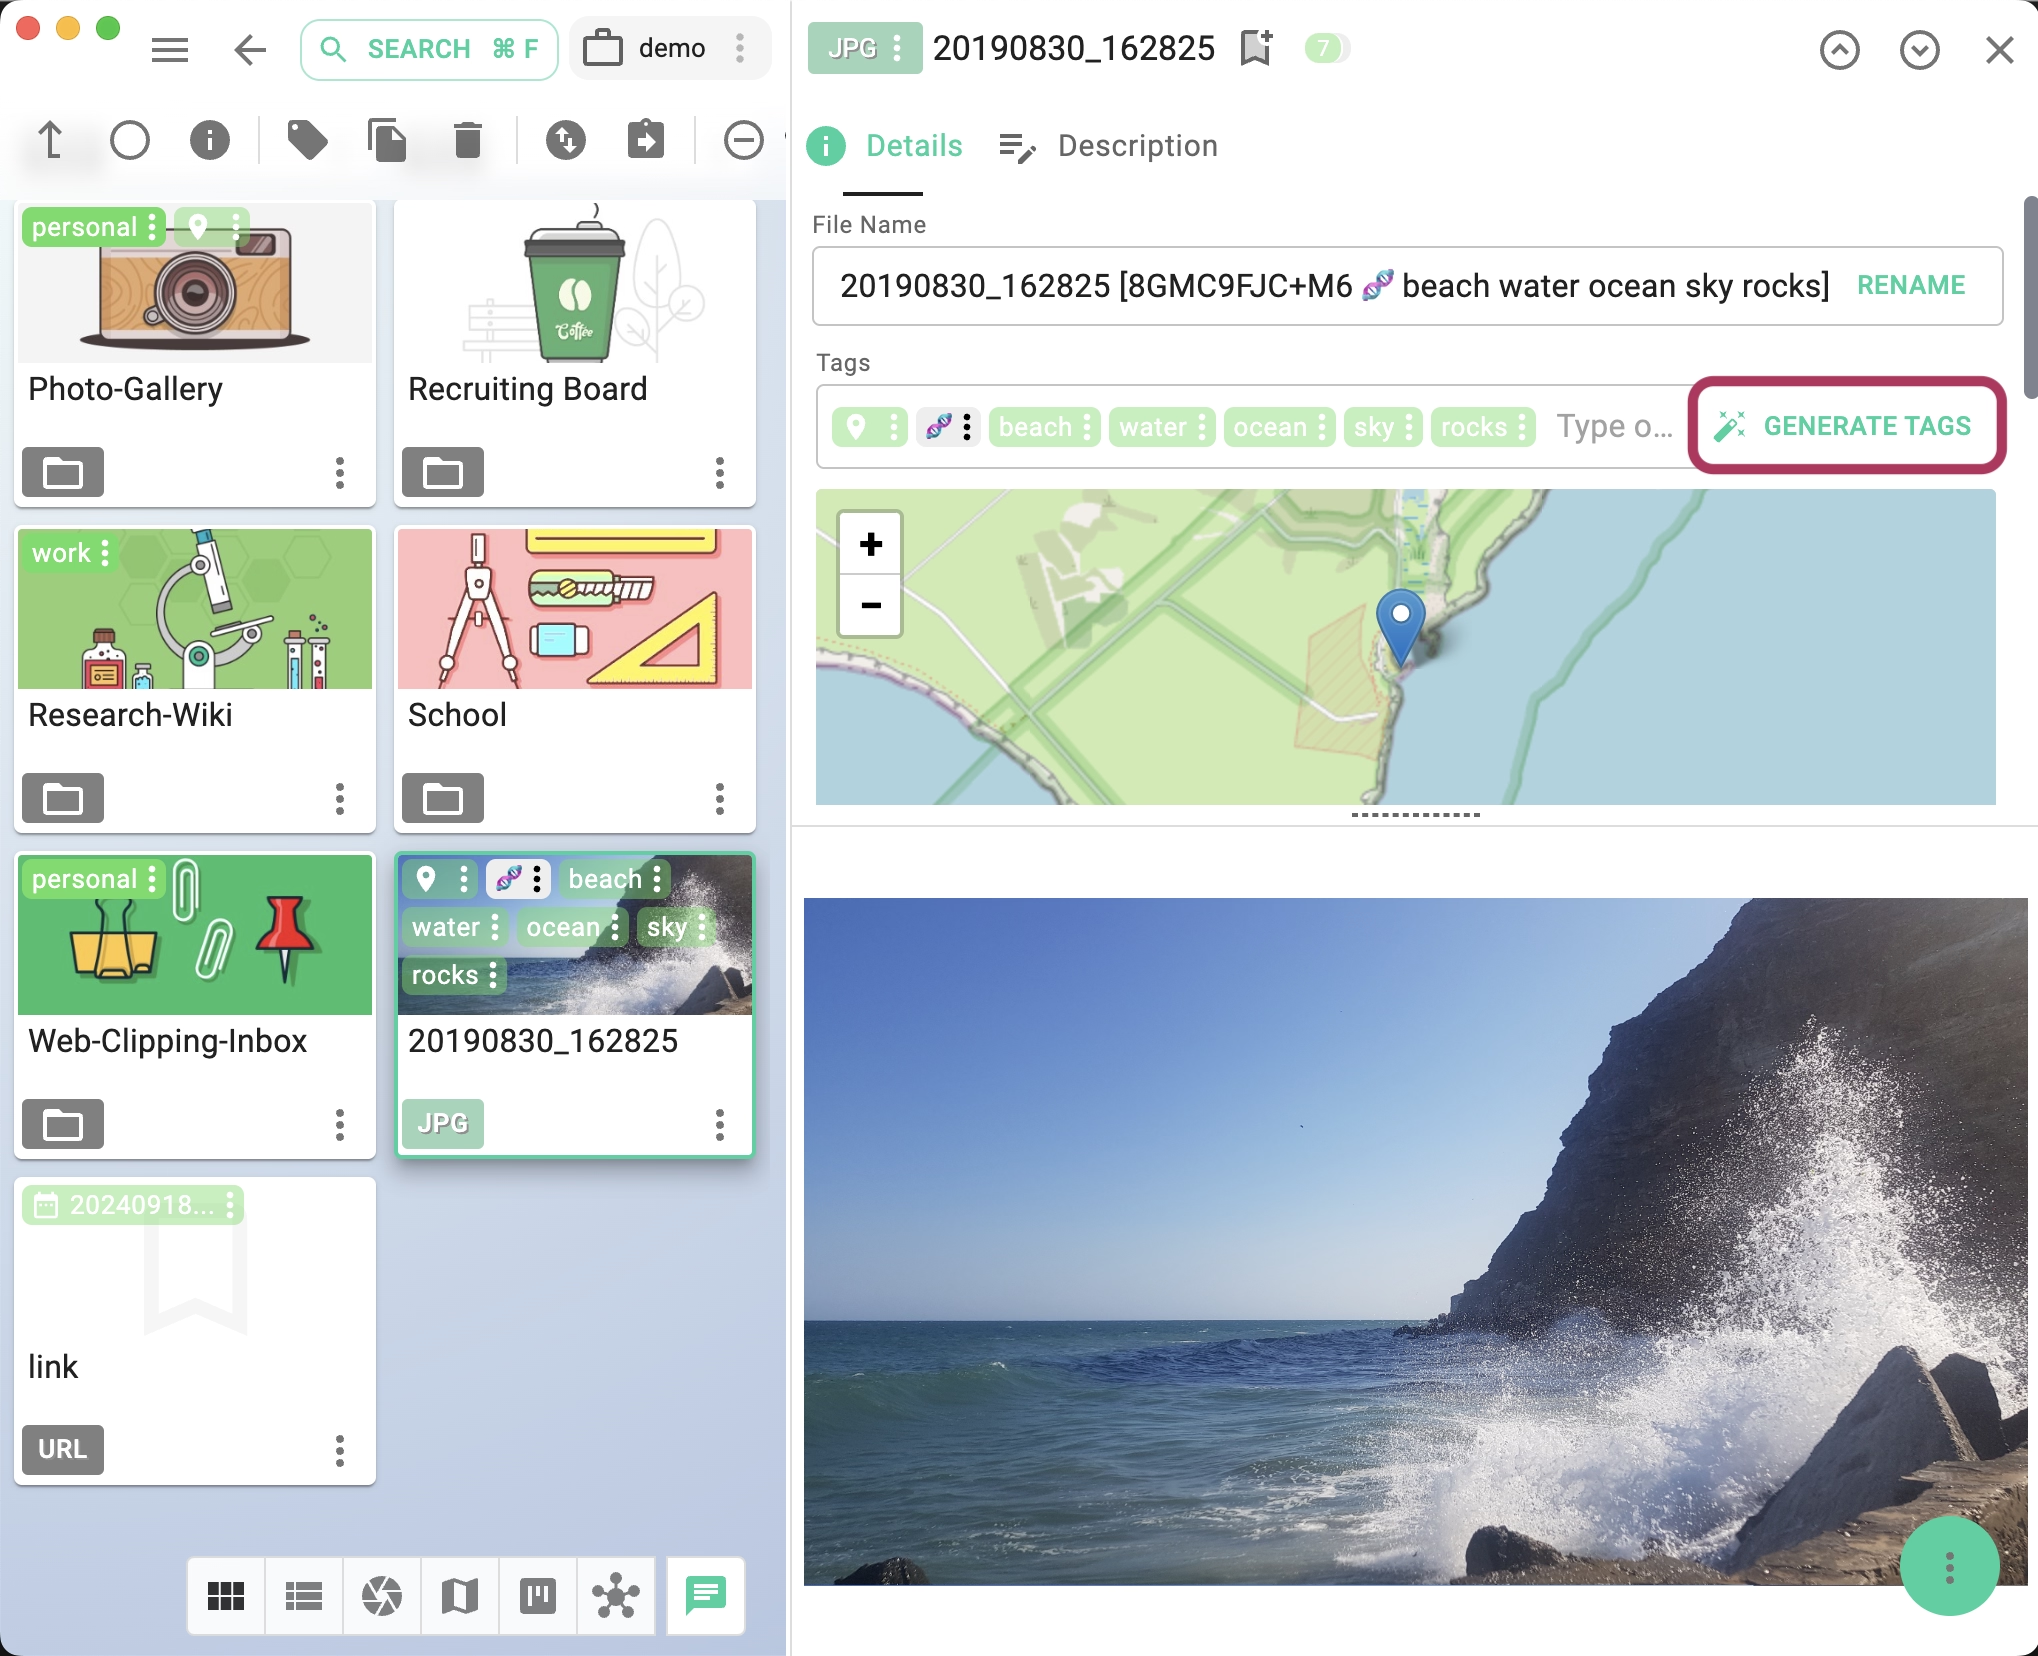
AI-related file features are part of the PRO version. The following functionalities are currently available:- Generate image descriptions for JPG and PNG files.
- Generate tags from image descriptions.

- Generate tags for images in JPG and PNG formats.
- Generate PDF descriptions based on the document's content.
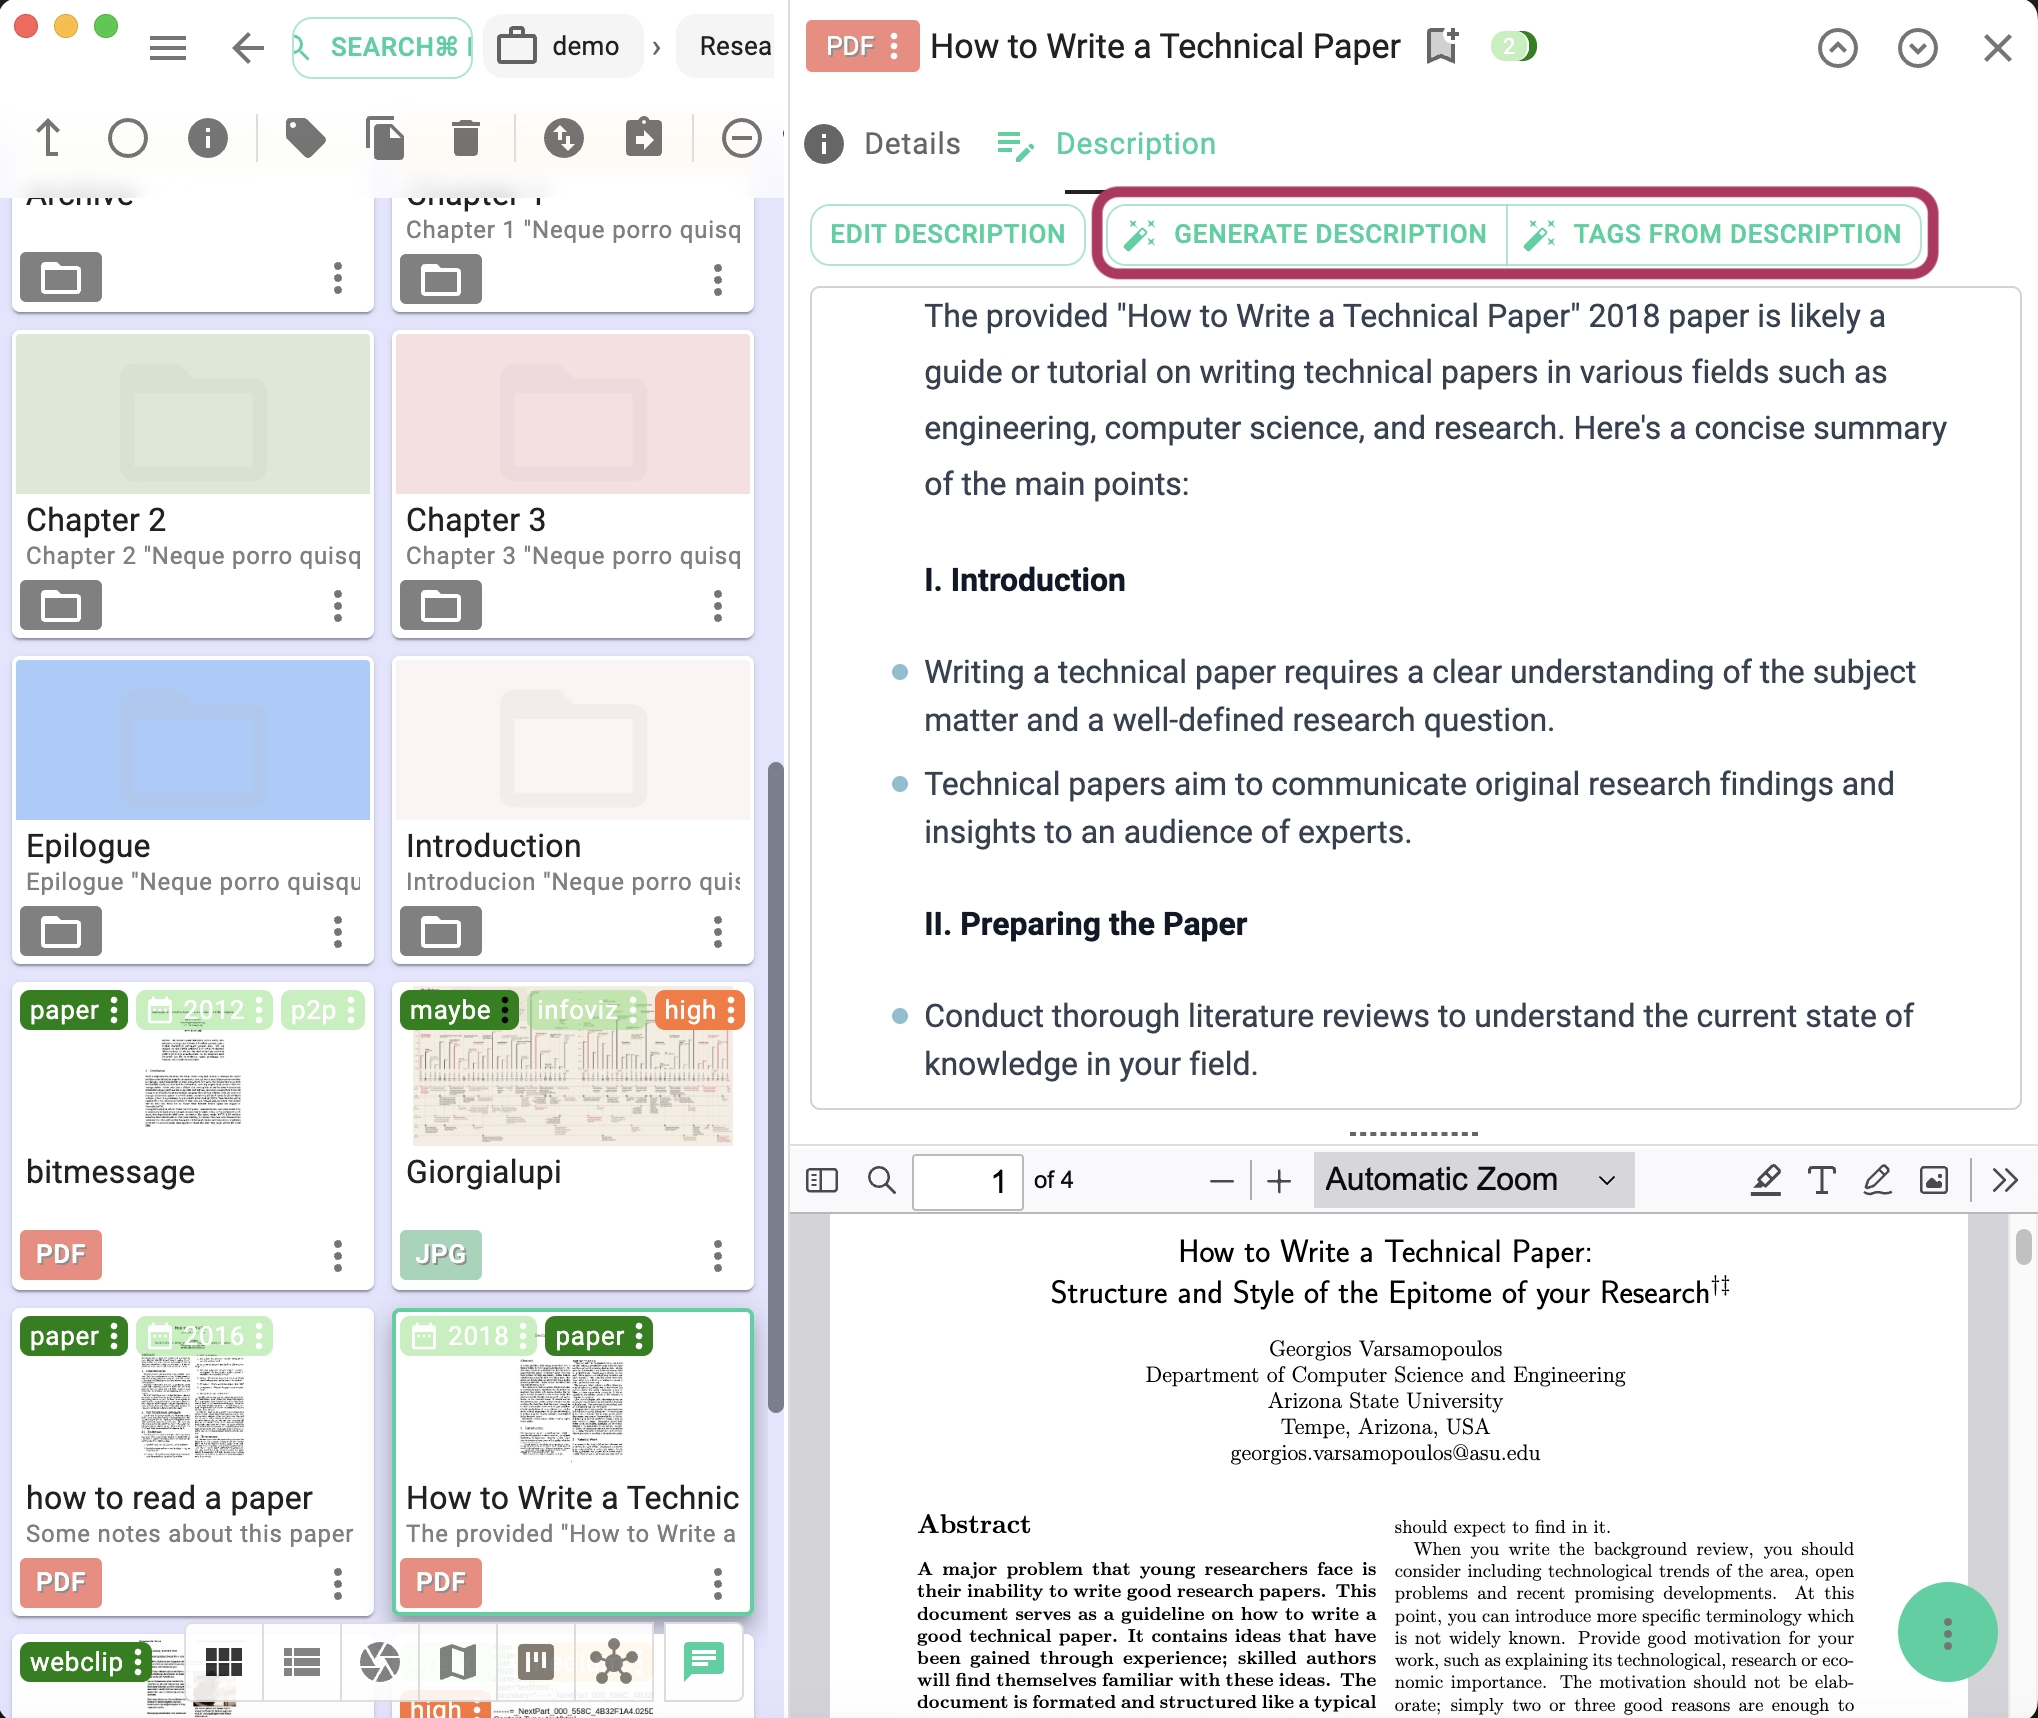
- Summarization of text-based files such as HTML, TXT, and Markdown.
- Extraction of dominant colors from images.
- Language configuration for the generated content.
Batch AI-processing
PRO
When you select one or more files in the current perspective, the AI button in the toolbar becomes active. Clicking this button opens the batch processing dialog.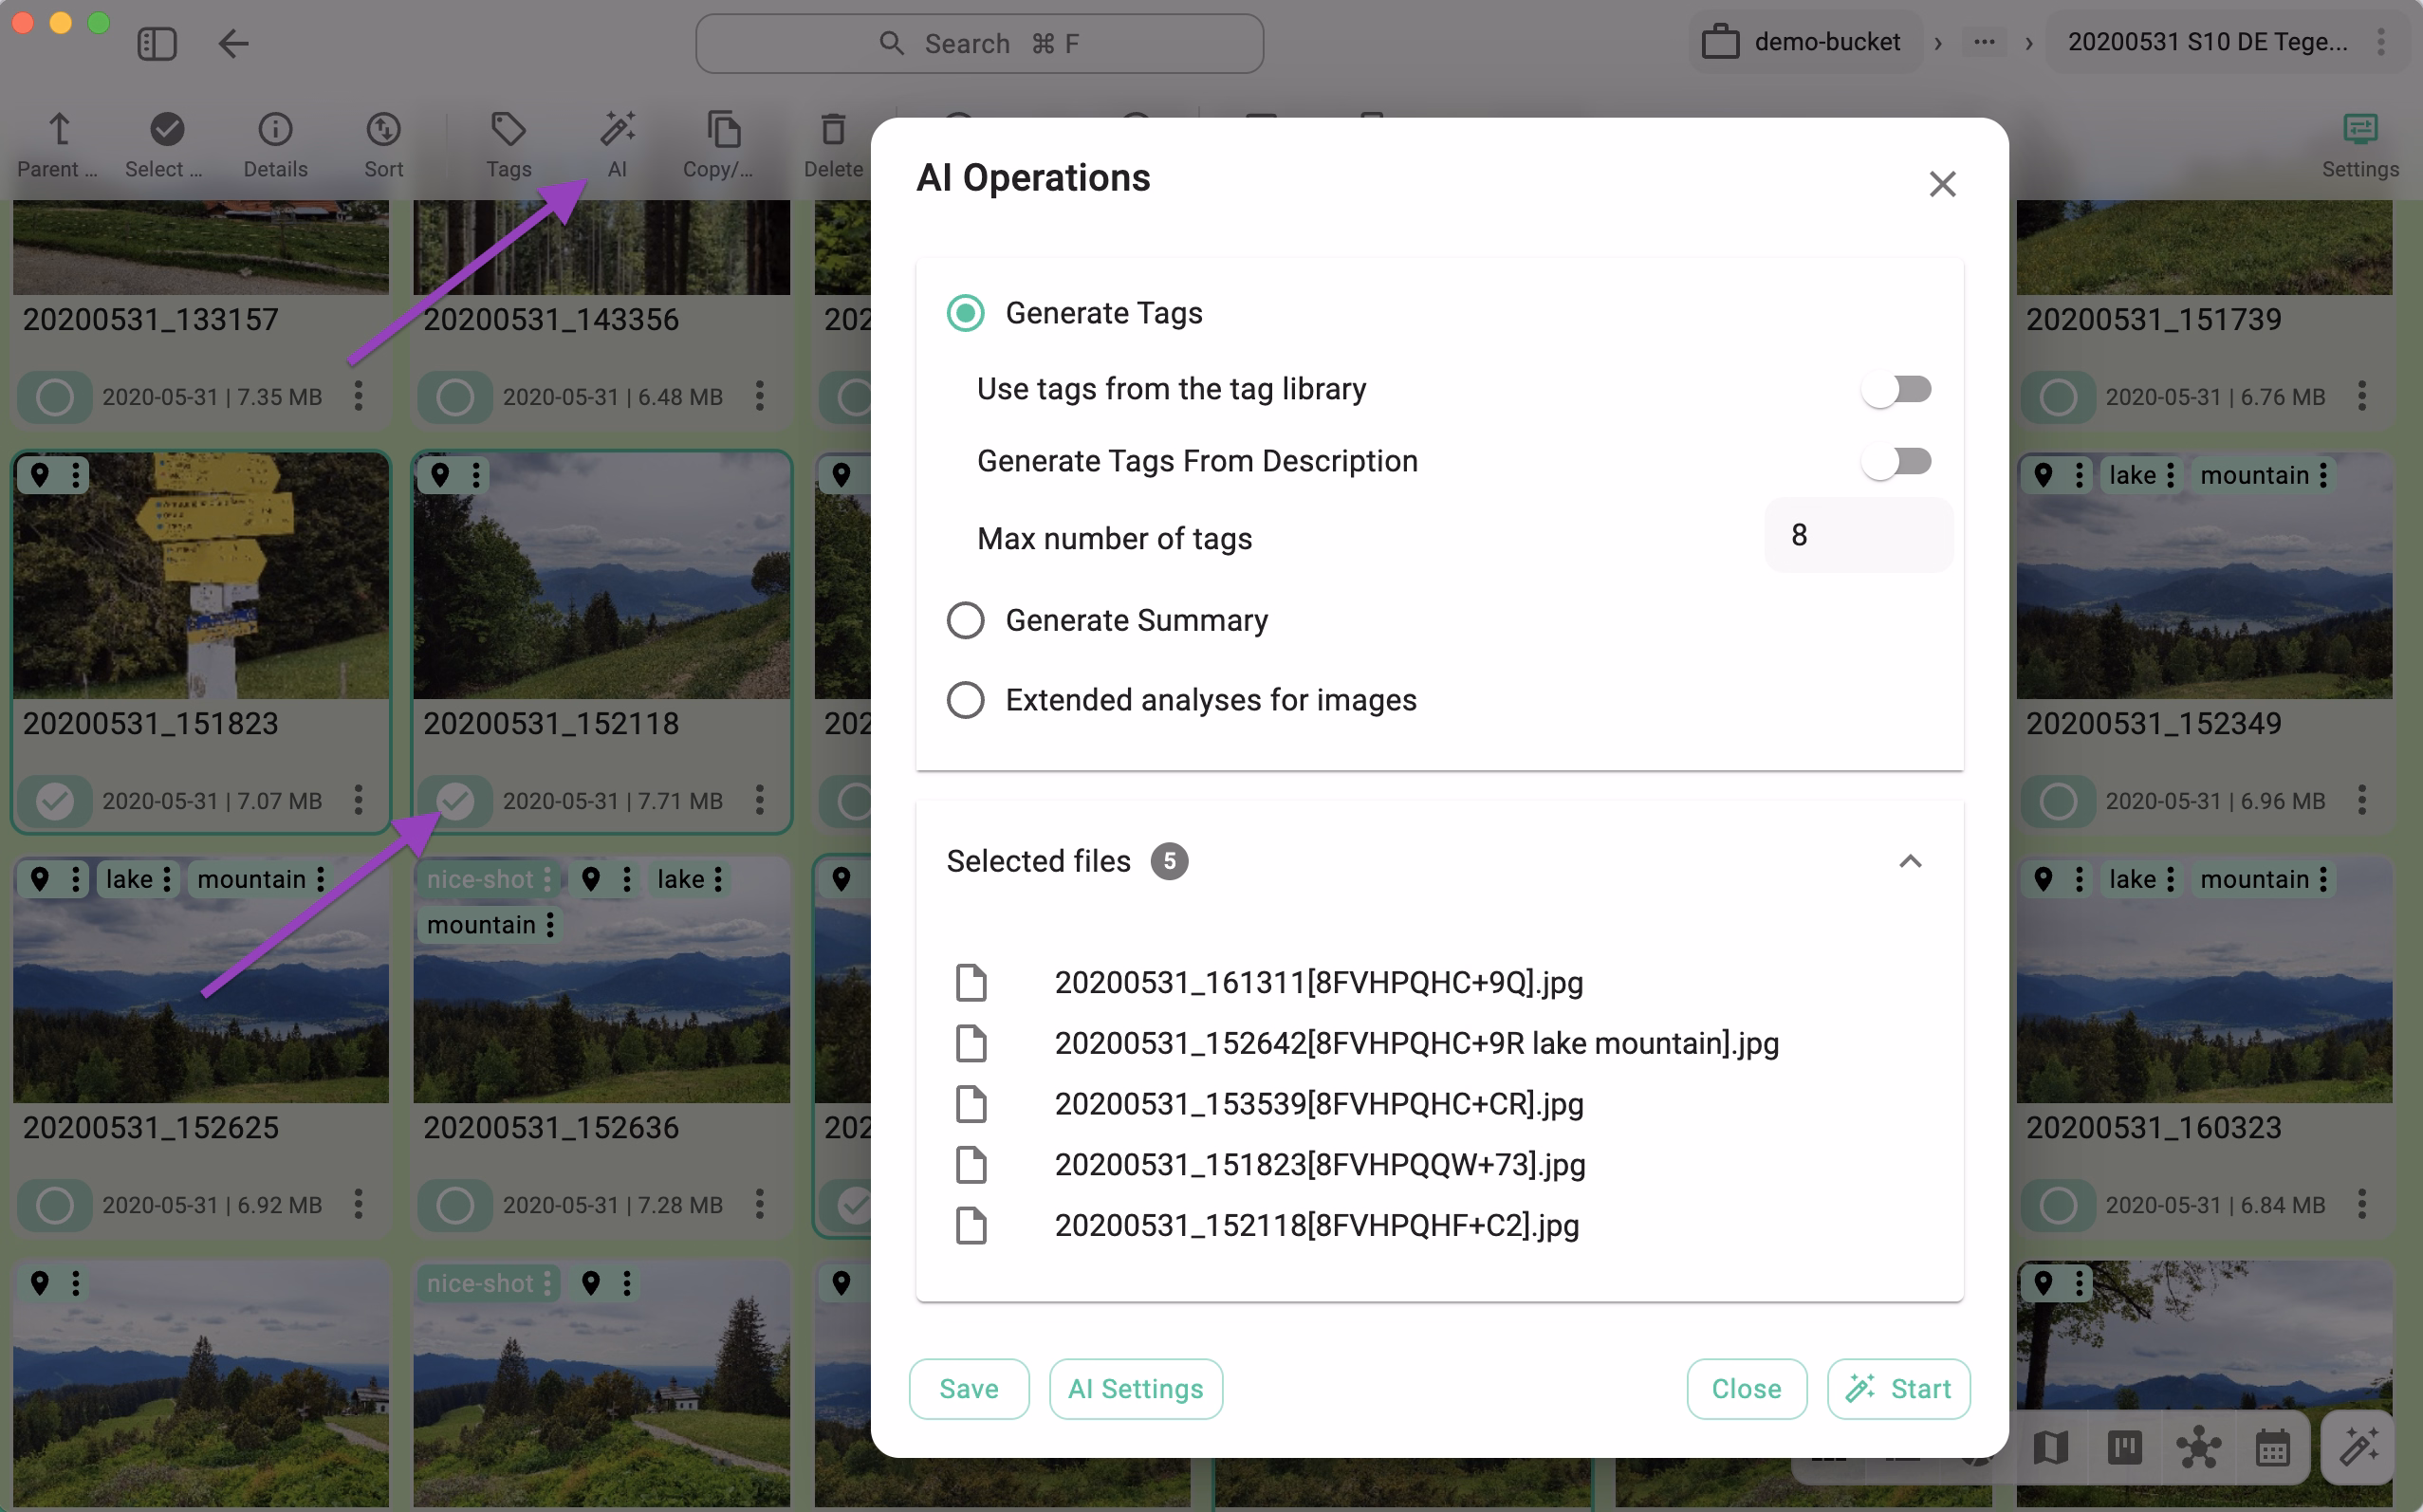
From this dialog, you can initiate the following tasks:
- Generate Tags – The following options apply:
- Use tags from the tag library: Restricts generated tags to those already present in your Tag Library.
- Generate tags from description: Uses only the file's existing description as the source for generating tags.
- Max number of tags: Limits the maximum number of tags generated per file.
- Generate Summary
- Limit the length of the summary: Enables character limits for the output.
- Max. characters for the summary: Specifies the maximum number of characters allowed in the generated summary.
- Append to description: Toggles between appending the summary to the existing file description (checked) or replacing the description entirely (unchecked).
- Language: Allows you to specify the target language for the summary (dependent on the capabilities of the selected model).
- Extended Image Analysis – These options are available only for images (PNG and JPG formats). A multimodal LLM must be configured in the AI settings for these features to work.
- Name: Generates a descriptive title for the image.
- Summary: Generates a summary of the visual content.
- Objects: Attempts to identify distinct objects within the image.
- Scene: Attempts to identify the scene type (e.g., landscape, office, beach).
- Colors: Identifies the dominant colors in the image.
- Time of the day: Estimates the time of day depicted in the photo.
- Settings: Attempts to identify the context or environment of the image.
- Text content in image: Extracts text found within the image (similar to OCR).
- Append analysis to description: Toggles between appending the analysis results to the existing description or replacing it.
Advanced Features
Custom Prompts for the AI Features
PRO
At the bottom of the AI settings tab, there is an Advanced section (closed by default). Expanding this section reveals text areas where you can adjust the system prompts used for various AI/LLM features. This is useful because different LLMs may produce better results with specific prompt structures.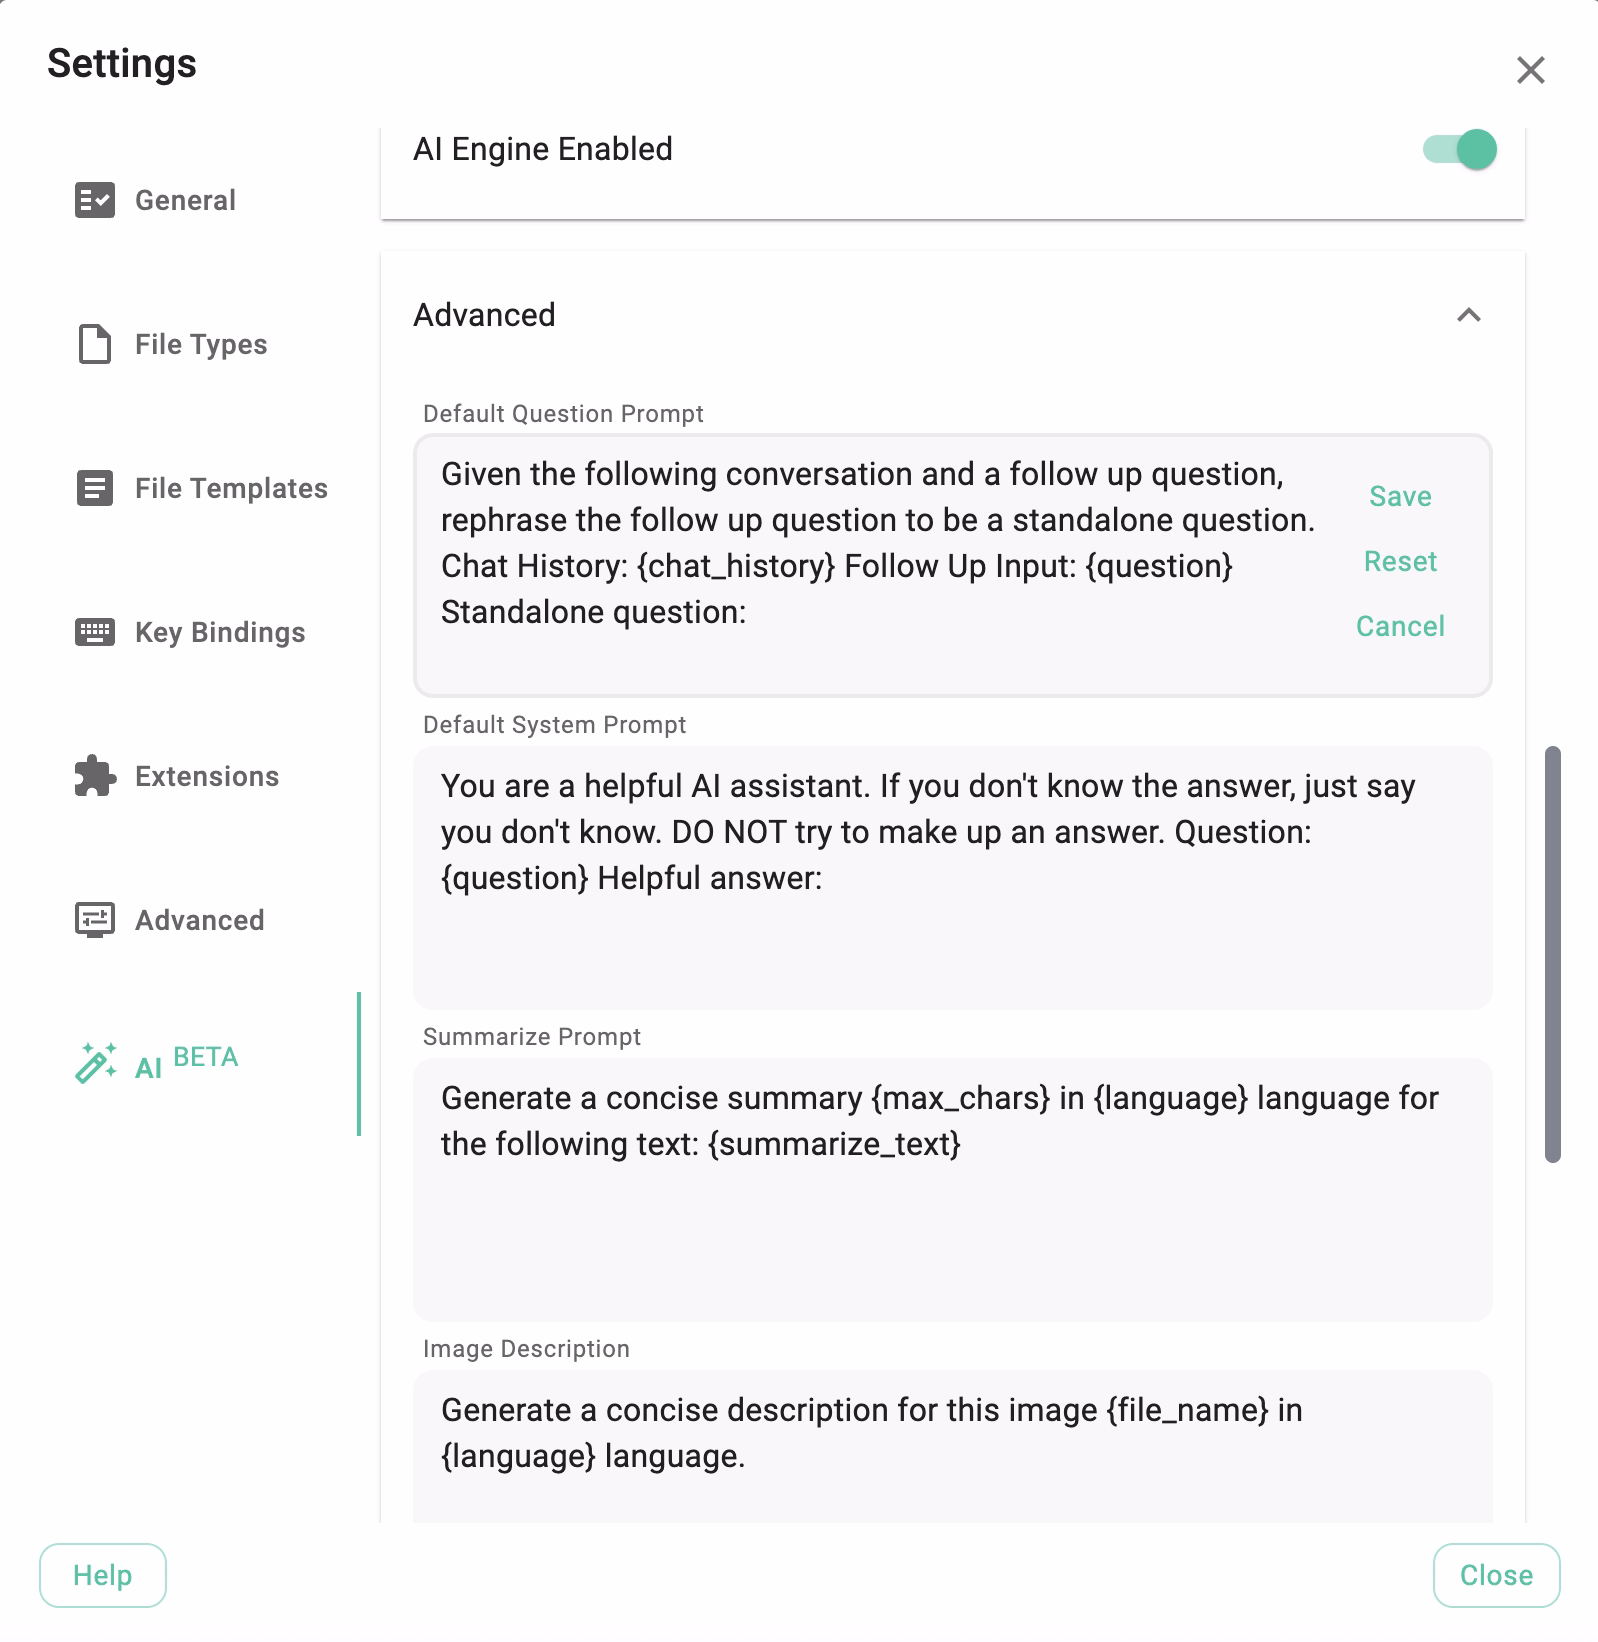
The following prompt types are supported:
- Summarize Prompt: Used for creating text summaries. Use the following variables to parameterize it:
{max_chars}- The maximum length of the summary in characters.{language}- The target language for the summary (output depends on the LLM's language capabilities).{summarize_text}- The source text to be summarized.
- Image Description Prompt: Used for creating descriptions based on visual content.
{file_name}- The filename of the image being analyzed.{language}- The target language for the description.
- Text Description Prompt: Used for creating descriptions based on text content.
{max_chars}- The maximum length of the description.{language}- The target language.{summarize_text}- The source text.
- Generate Image Tags: Used for generating tags based on visual content.
- Generate Tags: Used for extracting tags from text content.
{input_text}- The text content to analyze.
- Default Question Prompt: (Currently not in use).
- Default System Prompt: (Currently not in use).
Using Ollama from Your Local Network
You can share a single Ollama installation across multiple TagSpaces instances on your network. To do this, point the AI Engine URL in TagSpaces to the IP address of the computer running Ollama.
The screenshot below shows TagSpaces configured to use an Ollama installation running on a Mac located elsewhere on the local network.
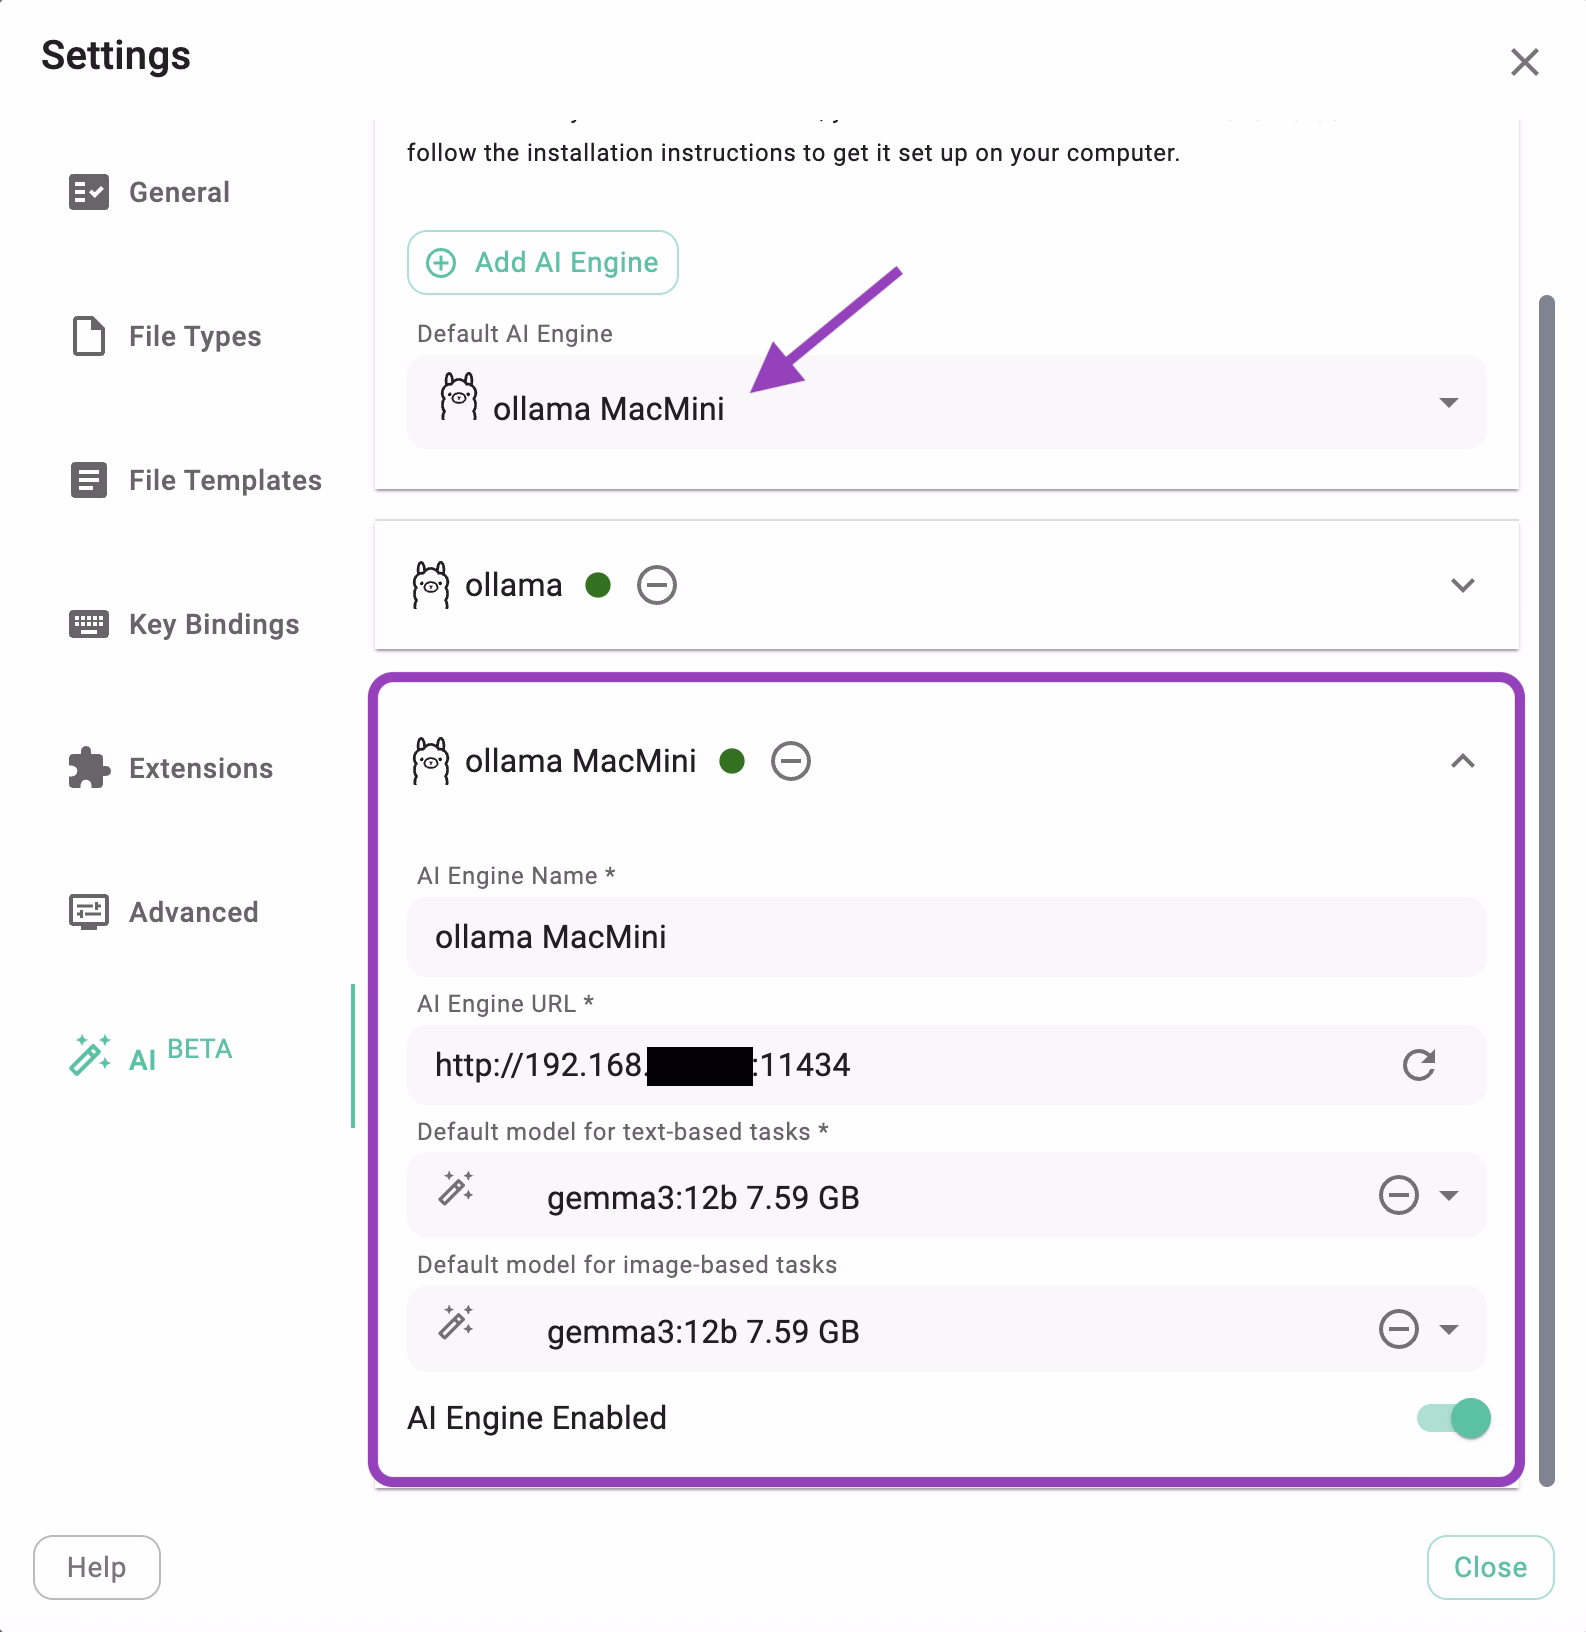
To allow external connections, you must configure the Ollama server to listen on all network interfaces rather than just localhost. This is done by setting the OLLAMA_HOST environment variable to 0.0.0.0 before starting the service. Once configured, other devices can connect using the server's IP address and the default port 11434.
Step 1: Set the OLLAMA_HOST environment variable
- macOS: Edit your
launchctlconfiguration to set theOLLAMA_HOSTenvironment variable to0.0.0.0before starting Ollama. - Linux: Edit the Ollama service file and add
OLLAMA_HOST=0.0.0.0. - Windows: Set the
OLLAMA_HOSTenvironment variable to0.0.0.0in your System Settings or User Account Settings before starting the Ollama server.
Step 2: Restart Ollama After setting the variable, stop any running Ollama processes and restart the service to apply the changes.
Step 3: Find the server's IP address
Locate the local IP address of the machine running Ollama (e.g., 192.168.1.100) and use it along with the port (e.g., 11434) to configure the AI Engine in TagSpaces.
You can find more details in the Ollama documentation.
Feedback
Feedback and new ideas are welcome in our forum.