Exposing local folders as object storage with S3Proxy
Introduction
The web version of TagSpaces can be used currently only with object storage as a backend. Such is offered by a countless cloud provider, starting with AWS from Amazon, Wasabi or R2 from Cloudflare. This is great if your files are located in the Cloud, but what if you want to connect your files from your NAS or other local shares, you will need local object storage server. And here comes S3Proxy in place. It is a web server, which can be used to expose local folders as S3 compatible buckets.
Running S3Proxy as Docker container
Running the S3proxy with Docker is the way we recommend, especially if you already use Docker to run the TagSpaces Web application.
sudo docker run -d \
    --restart=always \
    -p 9000:80 \
    --name s3proxy-local-fs \
    -e S3PROXY_AUTHORIZATION=aws-v2-or-v4 \
    -e S3PROXY_ENDPOINT="http://0.0.0.0:80" \
    -e S3PROXY_IDENTITY="username" \
    -e S3PROXY_CREDENTIAL="password" \
    -e S3PROXY_IGNORE_UNKNOWN_HEADERS=true \
    -e JCLOUDS_PROVIDER="filesystem" \
    -e JCLOUDS_FILESYSTEM_BASEDIR="/data" \
    -e S3PROXY_CORS_ALLOW_ALL="true" \
    -v /Users/yourusername/buckets:/data \
    andrewgaul/s3proxy \
Here is a short explanation of the docker command parameters. The parameter on line (2) is optional and makes Docker starting TagSpaces automatically after restart. Line (3) maps the internal port 80, specified on line (6), to port 9000 of the host computer, so TagSpaces Web can be accessed on localhost:9000 or 127.0.0.1:9000. On line (4) the name of the docker container is specified. Line (13) maps the host folder /Users/yourusername/buckets to the internal /data folder, which is the root folder of the S3Proxy server specified on line (11).
Every sub folder in the /Users/yourusername/buckets folder is served as a separate bucket by the S3Proxy service, so the name of the sub folder should be used later as bucket name in TagSpaces.
Line (5) is specifying the s3 authorization version, for TagSpaces Web and Desktop app you will need aws-v2-or-v4. On line (7) you should specify the username and on line (8) the password. Please change them according to your needs.
The local filesystem is specified as file backend on line (10). Line (12) disables the CORS restrictions, so you can access the S3 service from any host running TagSpaces. This is not always recommended and can be restricted with other parameters from the S3Proxy Dockerfile.
Line (14) specifies the name of the Docker image for the S3Proxy project, as published on Docker Hub.
Running S3Proxy as standalone program
You can start S3Proxy directly on your computer. On Linux or macOS you will need the program which can be downloaded from GitHub. You should make the s3proxy executable file with following command:
chmod +x s3proxy
And run it with the appropriate configuration file:
./s3proxy --properties s3proxy.conf
The content of the s3proxy.conf could be the following:
s3proxy.endpoint=http://127.0.0.1:9000
s3proxy.authorization=aws-v2-or-v4
s3proxy.identity=username
s3proxy.credential=password
s3proxy.ignore-unknown-headers=true
s3proxy.cors-allow-all=true
jclouds.provider=filesystem
jclouds.filesystem.basedir=/Users/yourusername/buckets
More details for installation and running the application on Windows can be found on the official webpage of the project.
Connecting to TagSpaces
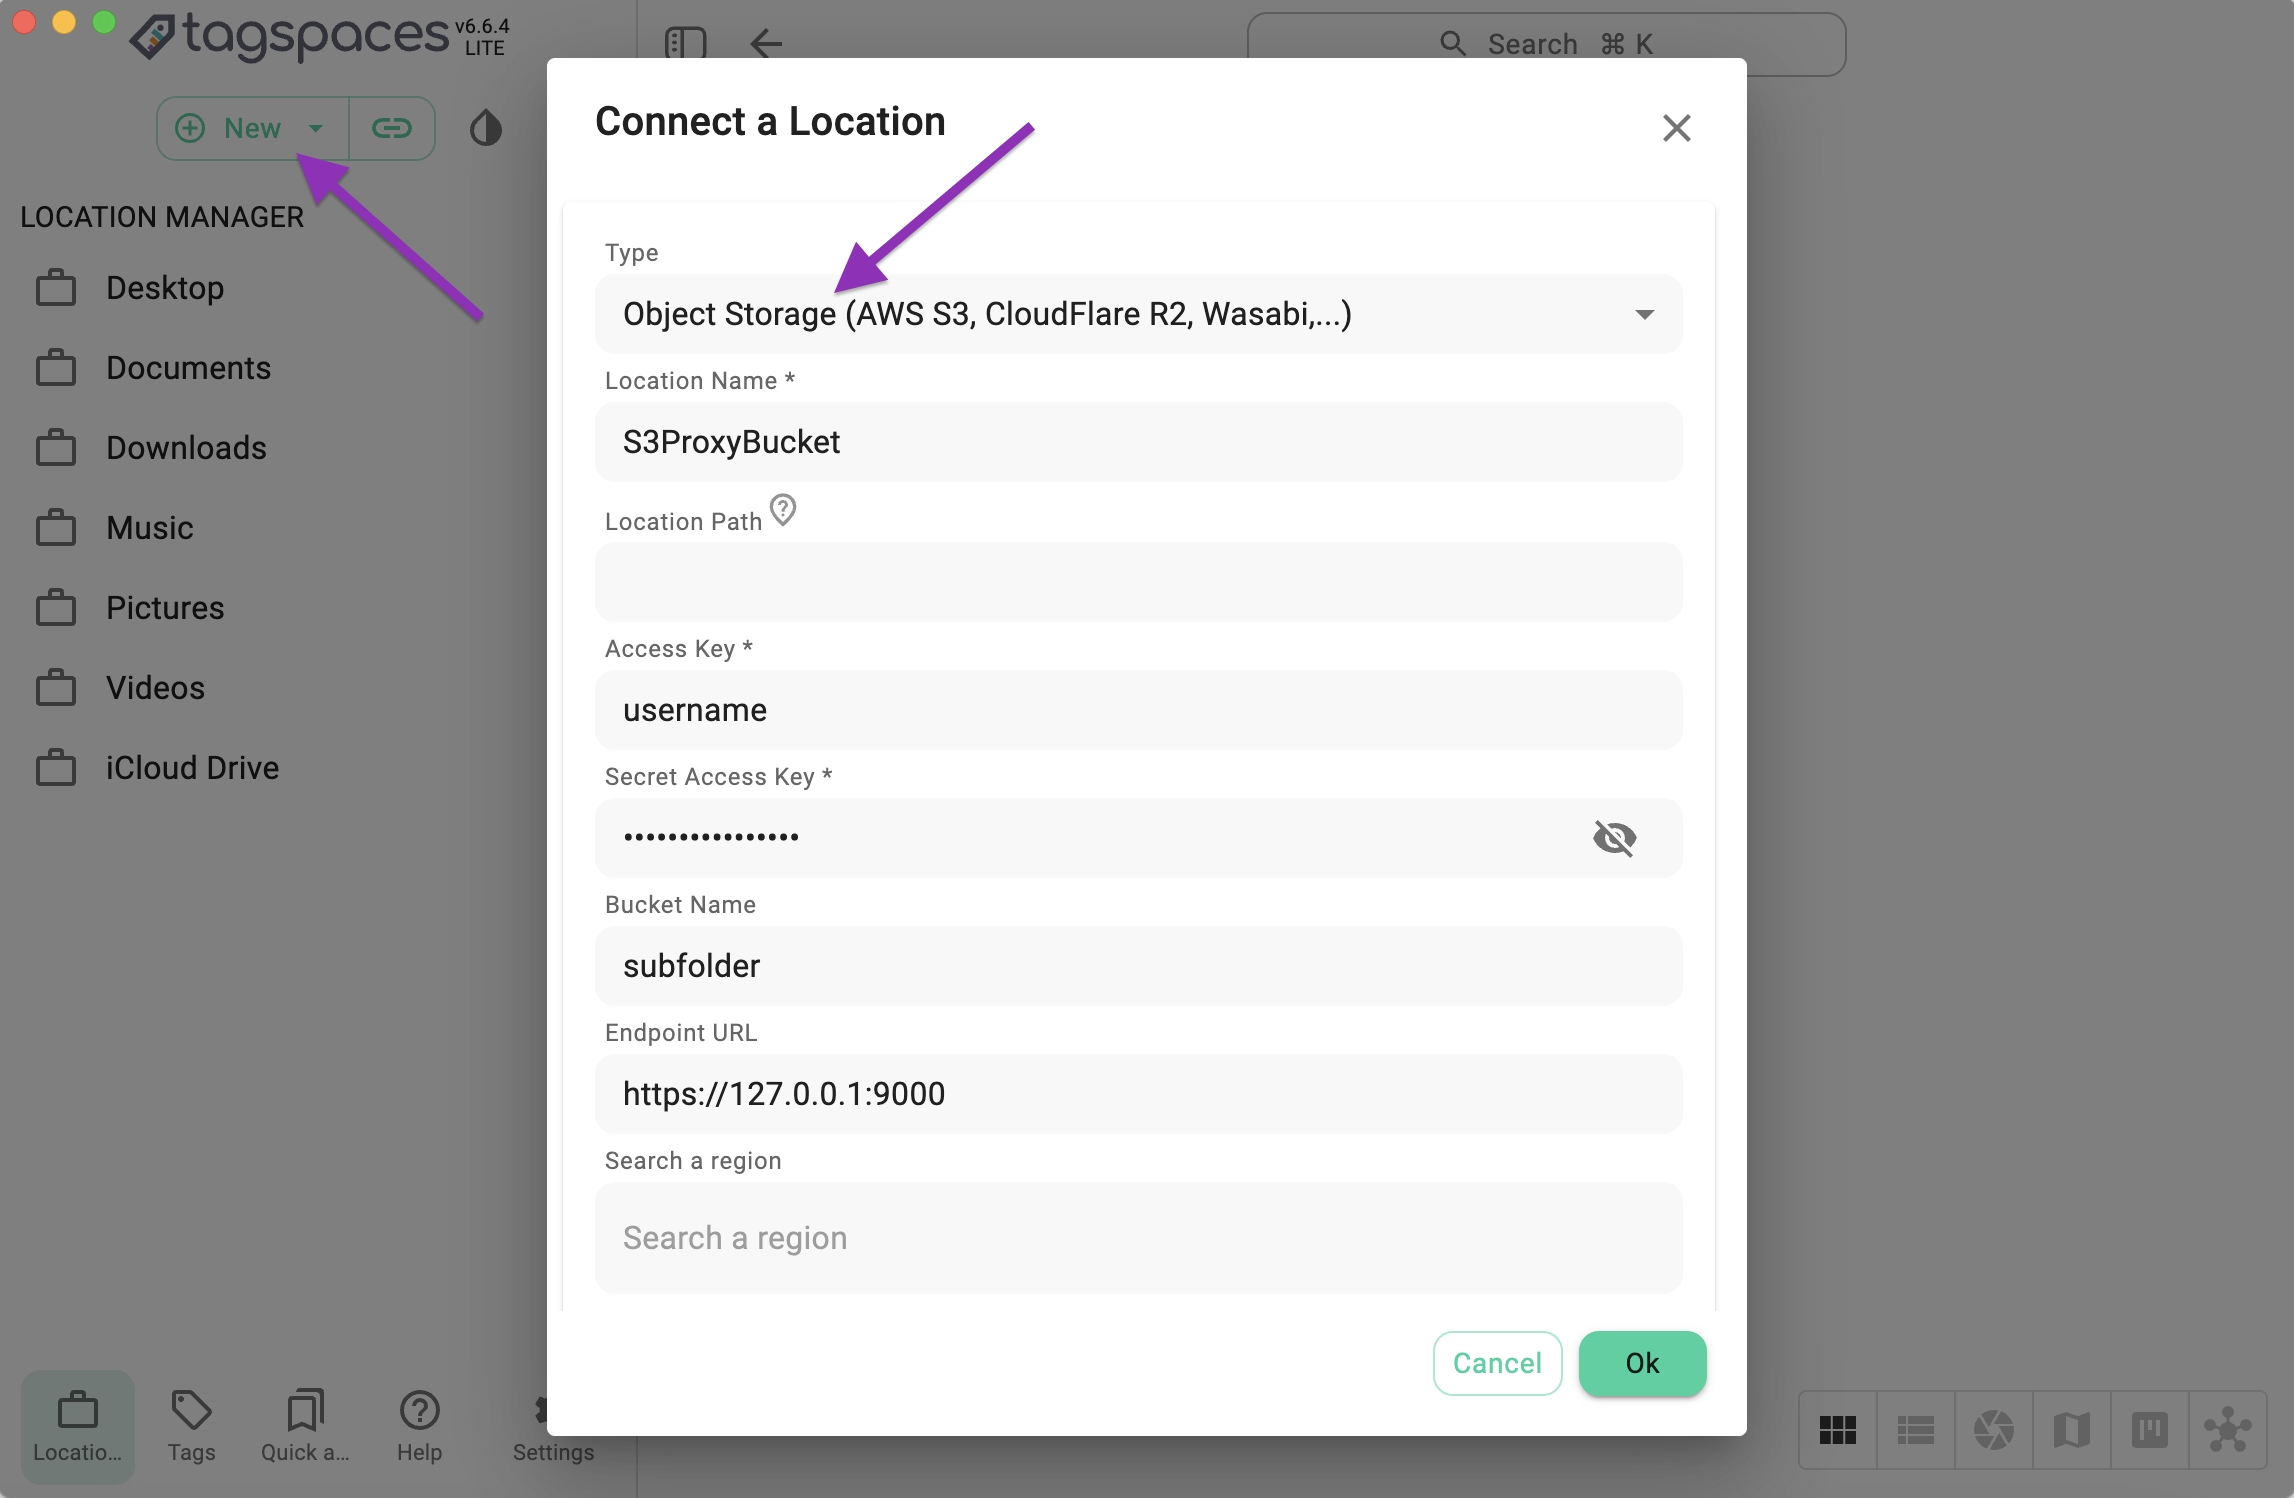
Now it’s time to connect your s3proxy bucket to TagSpaces.
- Open TagSpaces.
- Click the New button and select New Location.
- In the dialog, set the Location Type to Object Storage.
- Fill in the required fields:
- Location name – any name you prefer
- Access key and Secret key – as created earlier
- Bucket name – the name of any sub folder of the bucket folder, which was specified in the previous steps
- Endpoint URL – the URL with port of the s3proxy server, it could begin with
httporhttps, depending on the utilization of SSL certificate
Once everything is set, click OK to create the location.

Serving S3Proxy with SSL certificate
This is an important and recommended configuration, which is currently not covered by this tutorial. More details can be found here: https://github.com/gaul/s3proxy/wiki/SSL-support
Other use cases with S3Proxy
With S3Proxy you are able to connect some other cloud storage providers which does not support S3 directly. Some examples are:
- Azure Blob
- Backblaze B2
- Google Cloud Storage
- Rackspace Cloud Files
The corresponding configuration files can be found here: https://github.com/gaul/s3proxy/wiki/Storage-backend-examples
We haven't tried out all of them with TagSpaces, so any feedback will be valuable for us.