Setup publicly available TagSpaces Web on Wasabi
In this tutorial you will learn how to install TagSpaces Web or TagSpaces Pro Web on a Wasabi bucket and files from another bucket publicly. This is usefull if you wish to make a folder with file publicly available and integrate it on your website, similar to the demo web page of TagSpaces.
Wasabi is a provider of AWS S3 compatible object storage, with an attractive fixed price model, where the customer do not have to pay for download(egress) traffic. This tutorial can be used to make a similar setup with other S3 providers such as AWS S3.
Hosting the TagSpaces web app
In order to have the TagSpaces Web application on the Internet, you will need a place or service which will host the application's file. In our case this will be a S3 bucket which which we will create in the folloing steps.
- Login to Wasabi console and go Buckets section
- Click on the Create Bucket on the top right corner and give the following information:
- Bucket name: my-tagspaces - you can change the name something suitable for your use case
- Region: us-west-2 - choose a region which is near to the potential customer of the application
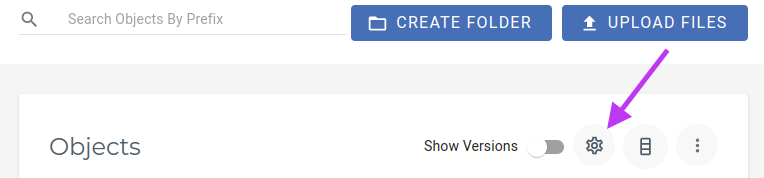
- After creating the bucket go to its Settings by clicking the button with gear icon.
- Go to the Policy tab and enter there the following securty policy. This way you will make the content of the bucket publicly asccessible. If you have used different name for the bucket you have to adjust it in the Resource section.
{
  "Version": "2012-10-17",
  "Statement": [
    {
      "Sid": "PublicReadGetObject",
      "Effect": "Allow",
      "Principal": "*",
      "Action": ["s3:GetObject"],
      "Resource": ["arn:aws:s3:::my-tagspaces/*"]
    }
  ]
}
-
Extract the content of the TagSpaces Web package to a folder on your computer
-
Clicking on the Uplad Files button and drag the content of the web folder to the area which will appear.
-
After the content of the folder is analysed you have to confirm the upload process.
-
Once the upload is ready you TagSpaces Web application will be available unter this url:
An alternative way to setup a TagSpaces (Pro) Web instance is to use Cloudflare Page, which is described in this tutorial.
Hosting your file in a public bucket
In this section a bucket for hosting your publicly available files will be created.
- Go again to the Buckets section and create a new bucket.
- For this turorial we will use my-cloud-files as the name of the bucket. Of course, you can choose here a more suitable name.
- Choose an appropriate hosting region, which can be the same as the app's bucket.
- Confirm the bucket creation by click on the Create Bucket button.
Setup read-only access to the files bucket
Here we will create a user whose access and secret keys will be available publicly, so all Internet users can access the my-cloud-files bucket in a read-only mode.
Create read-only policy
Go to the Policy section and create a new policy called TagSpacesReadOnlyPolicy with the following content. The policy restricts the user to just list and get object (e.g. files) from the bucket my-cloud-files.
{
  "Version": "2012-10-17",
  "Statement": [
    {
      "Sid": "VisualEditor0",
      "Effect": "Allow",
      "Action": ["s3:ListBucket", "s3:GetObject"],
      "Resource": [
        "arn:aws:s3:::my-cloud-files",
        "arn:aws:s3:::my-cloud-files/*"
      ]
    }
  ]
}
Do not forget to adjust the name of the buckets in the Resource section to reflect the name of the buckets you want to manage with the policy.
Create read-only user
Go to the user's section and creata a new user, by clicking on the Create User button. You can the user my-ts-admin.
Choose the TagSpacesReadOnlyPolicy policy in the creation wizard for this user, as shown in the following screenshot.
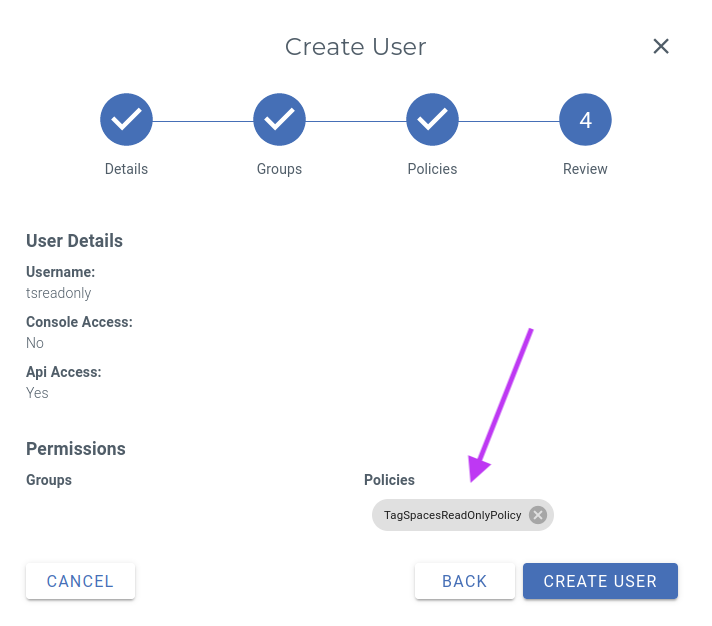
After clicking the Create User button, the user will be created and a key pair will be generated. Copy the generated key pair for a later use. The copied text will look like this:
access-key= MYACCESSKEYRO secret-key= MYSECRETKEYRO
Setup admin access and policy
In this section we will create a admin user, who will be able to manage the files in the my-cloud-files bucket and updating the app in the my-tagspaces bucket. You can also create separate users for managing the both buckets.
Create admin policy
We have to create an admin policy with rights to administrate these two bucket. To do this you to go to the Policy section and create a new policy called TagSpacesAdminPolicy with the following content.
{
  "Version": "2012-10-17",
  "Statement": [
    {
      "Sid": "VisualEditor0",
      "Effect": "Allow",
      "Action": [
        "s3:GetObjectAcl",
        "s3:GetObjectVersionAcl",
        "s3:DeleteObject",
        "s3:GetBucketWebsite",
        "s3:GetBucketNotification",
        "s3:GetReplicationConfiguration",
        "s3:ListMultipartUploadParts",
        "s3:PutObject",
        "s3:GetObject",
        "s3:RestoreObject",
        "s3:ListBucket",
        "s3:GetBucketPolicy",
        "s3:GetObjectVersionTorrent",
        "s3:AbortMultipartUpload",
        "s3:GetBucketRequestPayment",
        "s3:PutObjectAcl",
        "s3:ListBucketMultipartUploads",
        "s3:GetBucketVersioning",
        "s3:GetBucketAcl",
        "s3:GetObjectTorrent",
        "s3:GetBucketCORS",
        "s3:GetBucketLocation",
        "s3:GetObjectVersion"
      ],
      "Resource": [
        "arn:aws:s3:::my-tagspaces",
        "arn:aws:s3:::my-tagspaces/*",
        "arn:aws:s3:::my-cloud-files",
        "arn:aws:s3:::my-cloud-files/*"
      ]
    }
  ]
}
Do not forget to adjust the name of the buckets in the Resource section to reflect the name of the buckets you want to manage with the policy.
Depending on your needs you can reduce the granted actions in the policy above.
Create admin user
Go to the user's section and creata a new user, by clicking on the Create User button. You can the user my-ts-admin.
Choose the TagSpacesAdminPolicy policy in the creation wizard for this user, as shown in the following screenshot.

After clicking the Create User button, the user will be created and a key pair will be generated. Copy the generated key pair in save place for a later use. The copied text will look like this:
access-key= MYACCESSKEYRW secret-key= MYSECRETKEYRW
Please do not share the access key for this user, since it has a full access to the both buckets.
Preparing extconfig.js
Create a file called extconfig.js, copy the content from bellow in it and upload it to the root of the my-tagspaces bucket.
  window.ExtLocations = [
      {
        "uuid": "f15de534-4326-40c3-9f6a-3547azb97518",
        "type": "1",
        "name": "My Cloud Files",
        "path": "",
        "paths": [
          ""
        ],
        "endpointURL": "https://s3.us-west-2.wasabisys.com",
        "accessKeyId": "MYACCESSKEYRO",
        "secretAccessKey": "MYSECRETKEYRO",
        "bucketName": "my-cloud-files",
        "region": "",
        "isDefault": true,
        "isReadOnly": true,
        "disableIndexing": true,
        "fullTextIndex": false,
        "watchForChanges": false,
        "maxIndexAge": 600000,
        "creationDate": "2023-01-12T17:35:21.451Z",
      }
    ]
Please make sure that you put here the readonly key with the very limited security policy, since this file will be publicly available. Be aware that, by having the readonly keys publicly, anybody can easily download all the files from the my-cloud-bucket.
Workflow for syncing files using Rclone
All photos can be collected in one folder on a local computer and synced via scripts on a regular basic to the my-cloud-photos bucket.
- Download and install Rclone from: https://downloads.rclone.org/
- Unzip the file and place rclone(.exe) in a folder from which you want make the sync
- Create a new text file called
rclone.configwith the following content:
[mycloudfiles]
type = s3
provider = Wasabi
access_key_id = MYACCESSKEYRW
secret_access_key = MYSECRETKEYRW
endpoint = s3.us-west-2.wasabisys.com
acl = private
-
Create a new text file called
syncmyfiles.cmdwith the following content:rclone sync "MyCloudFiles" "mycloudfiles:my-cloud-files" -v --config=rclone.config
-
In the previous command the MyCloudFiles is the name of the folder which content will be synced to the bucket. Other examples could be D:\Photos\MyCloudFiles or ../MyCloudFiles.
-
Run the syncmyfiles.cmd on a regular basis in order to sync your local photos with the cloud
├── MyCloudFiles
├── rclone(.exe)
└── rclone.config
Integration in web page
URL of the TagSpaces Web installation on Wasabi: https://my-tagspaces.s3.us-west-2.wasabisys.com/index.html
You can integrate it on any HTML web page using similar iframe code:
  <iframe style="width: 100%; height: 700px; border: none" src="https://my-tagspaces.s3.us-west-2.wasabisys.com/index.html" >
    My TagSpaces App
  </iframe>
Created in TagSpaces on 2023-01-12.