Nightly Indexing of a NAS Share on Windows
Opening a TagSpaces location that points to a NAS share with tens of thousands of files can be slow, because by default TagSpaces walks the whole folder tree to build its search index. A much better setup for large network shares is to pre-build the index with the tscmd command line tool and let a scheduled Windows job refresh it every night — for example at 1:00 AM, when nobody is working on the files.
In this tutorial you will:
- Mount a NAS shared folder as a network drive on Windows
- Install Node.js, npm and the
tscmdCLI - Create a search index for the share with
tscmd indexer - Configure TagSpaces to load this pre-built index instead of indexing on its own
- Set up a recurring Windows Task Scheduler job that re-indexes the folder every night at 1:00 AM
Prerequisites
- A Windows 10 or Windows 11 computer
- A NAS (Synology, QNAP, TrueNAS, …) exposing a shared folder over SMB, reachable from your computer (e.g.
\\NAS\Documents) - Credentials for the NAS share, if it is not public
- TagSpaces Pro — the Disable Indexing location option, which makes TagSpaces load the pre-built index, is a Pro feature. Creating the index with
tscmditself works without Pro.
Step 1 — Mount the NAS shared folder as a network drive
If your NAS share is not mounted yet, map it to a drive letter:
- Open File Explorer and right-click on This PC → Map network drive…
- Pick a free drive letter, for example
Z: - Enter the share path, for example
\\NAS\Documents - Check Reconnect at sign-in, and if the share needs credentials, check Connect using different credentials
- Click Finish and enter the NAS username and password when prompted. Check Remember my credentials so Windows stores them in the Credential Manager.
After that, the share is accessible both as Z:\ and via its UNC path \\NAS\Documents. Remember both forms — the difference will matter for the scheduled job in Step 6.
Step 2 — Install Node.js and npm
tscmd is distributed as an npm package, so you need Node.js (which includes npm).
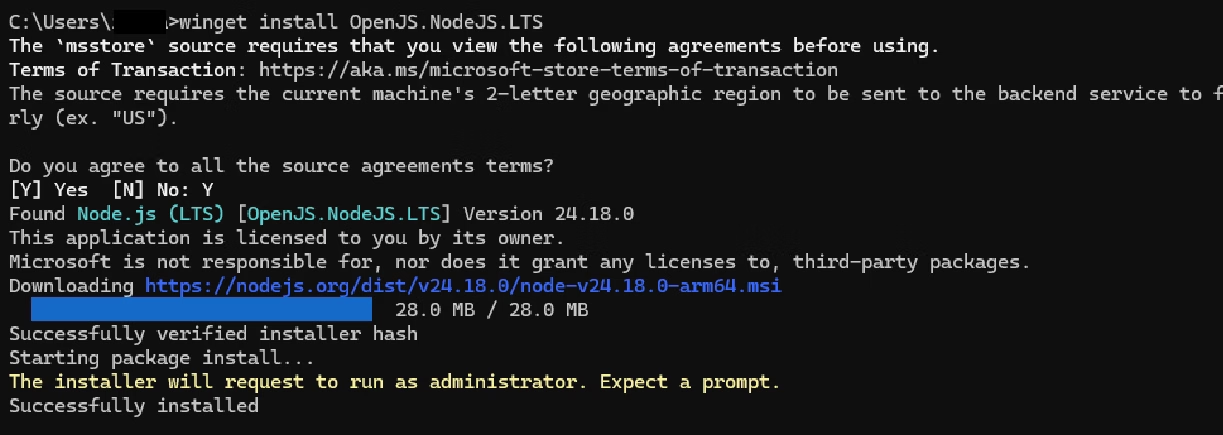
The quickest way is the built-in Windows package manager winget. Open a Command Prompt or PowerShell window and run:
winget install OpenJS.NodeJS.LTS
Alternatively, download the LTS installer from nodejs.org and click through the setup wizard — the default options are fine.
Close and reopen your terminal window (so the updated PATH is picked up) and verify the installation:
node -v
npm -v
Both commands should print a version number, for example v22.17.0 and 10.9.2.
Step 3 — Install tscmd
Install the TagSpaces CLI globally with npm:
npm install -g @tagspaces/shell
Verify that the tscmd command is available:
tscmd --help
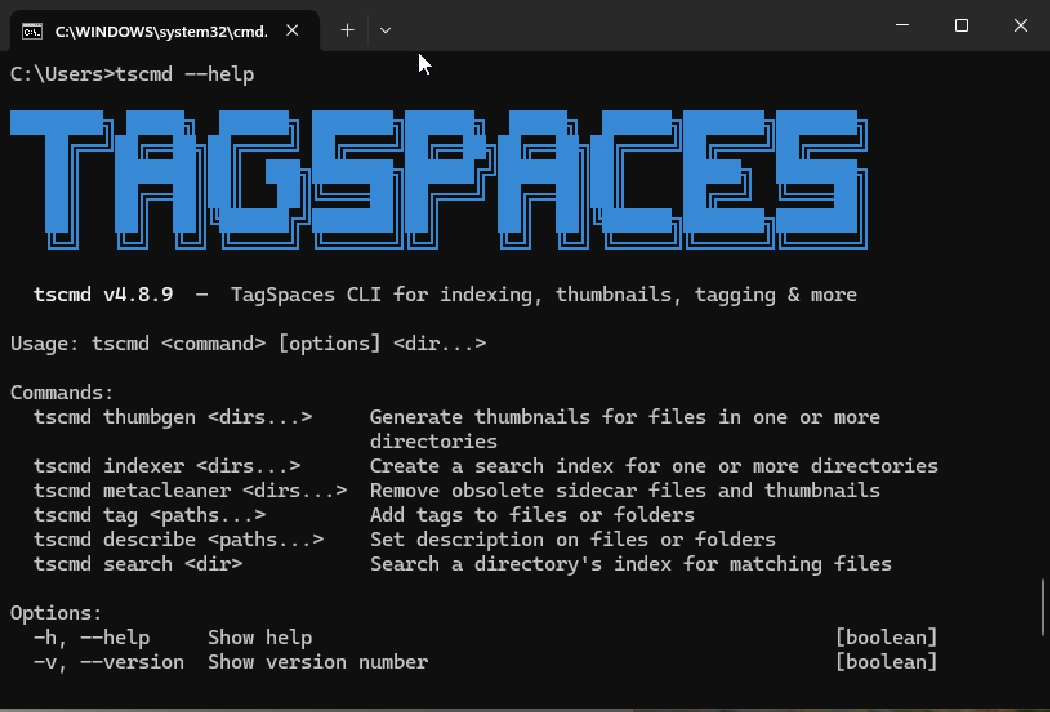
Also note the full path where npm placed the command — you will need it later for the scheduled task, which does not always see the same PATH as your terminal:
where tscmd
On a default per-user Node.js installation this prints something like:
C:\Users\YourUserName\AppData\Roaming\npm\tscmd
C:\Users\YourUserName\AppData\Roaming\npm\tscmd.cmd
Write down the path ending in tscmd.cmd.
Step 4 — Create the index for the first time
Run the indexer manually once against the mounted share (or a subfolder of it):
tscmd indexer "Z:\"
If you also want full-text search over the content of text files, PDFs, Office documents, emails and ebooks, add the --fulltext flag:
tscmd indexer --fulltext "Z:\"

The command walks the whole folder tree and writes the index into a .ts subfolder at the root of the indexed folder:
Z:\.ts\tsi.json— the metadata index (names, tags, sizes, timestamps, descriptions)Z:\.ts\tsft.jsonl— the extracted full-text content, only when--fulltextwas used
The first run on a big share can take a while, especially with --fulltext. Subsequent runs are incremental: only files whose size or modification time changed are re-processed, and entries for deleted files are pruned, so the nightly refresh is much faster. See the tscmd documentation for all available options.
You can index several folders in one call, e.g. tscmd indexer "Z:\Documents" "Z:\Photos". Each folder gets its own .ts\tsi.json, matching one TagSpaces location each.
Step 5 — Let TagSpaces use the pre-built index
Now tell TagSpaces to load this index instead of re-indexing the share on every location open:
- In TagSpaces, create a location pointing to the same folder you indexed (e.g.
Z:\), or edit the existing one - In the location properties, enable the option Disable Indexing PRO
- Save the location
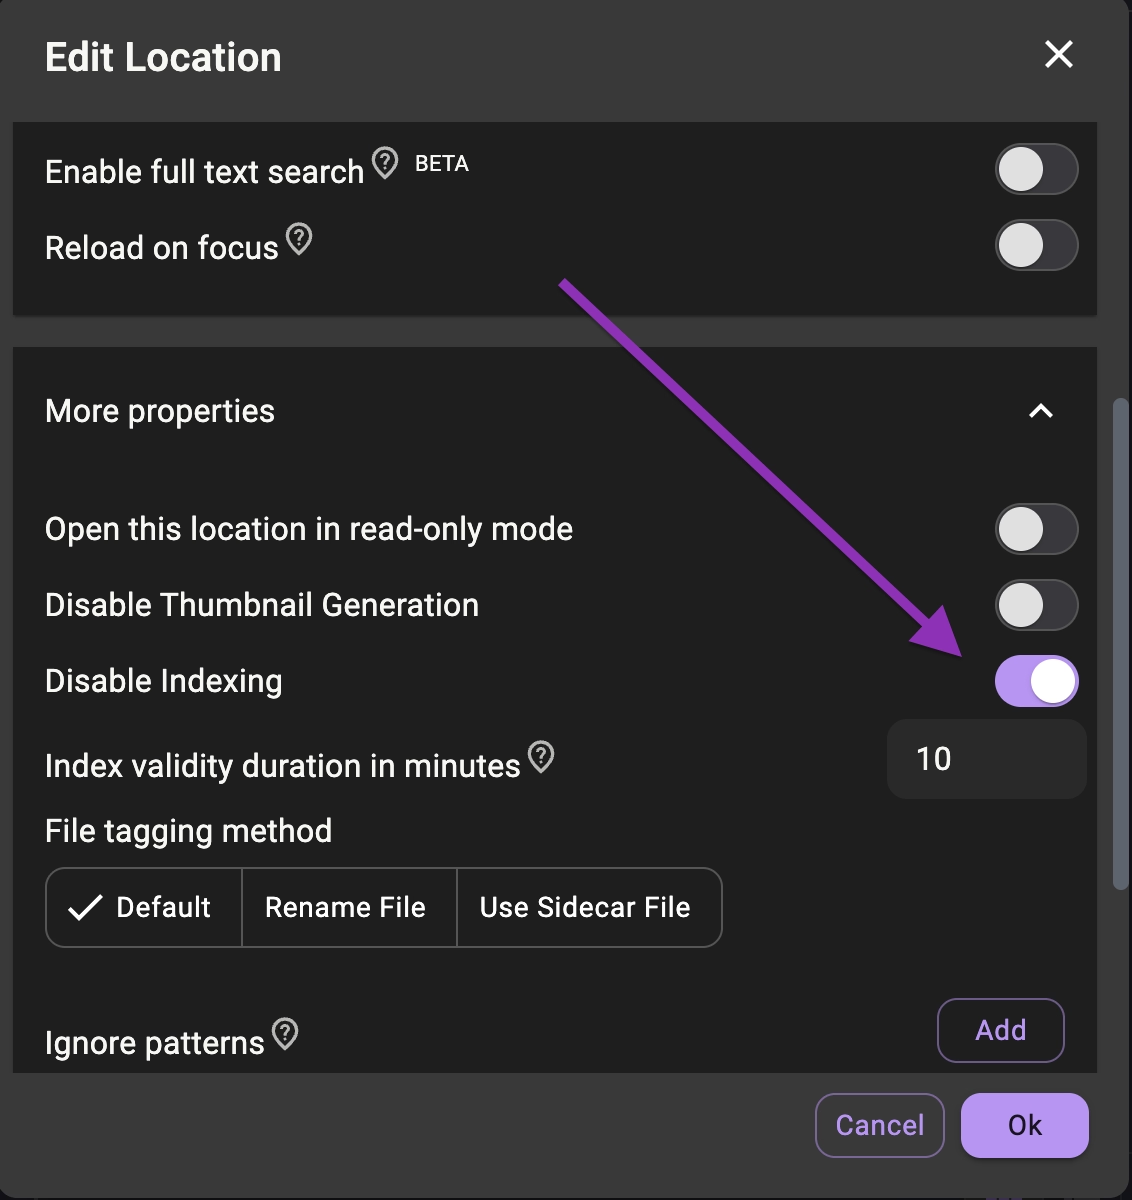
With this option enabled, TagSpaces skips its own indexing and loads the tsi.json created by tscmd, so even huge network locations open and search almost instantly. More details can be found in the locations documentation.
The paths inside the index are stored relative to the indexed folder. It therefore does not matter whether the index was created via the mapped drive (Z:\) or the UNC path (\\NAS\Documents) — the TagSpaces location can use either path form.
Step 6 — Schedule the nightly indexing job
Windows ships with the Task Scheduler, which can run any script on a recurring schedule.
6.1 Create the indexing script
First wrap the indexing command into a small batch script, so the scheduled task has a single, robust entry point. Create the folder C:\Scripts, and inside it a file called tagspaces-index.cmd with the following content:
@echo off
setlocal

REM === adjust these three lines to your setup ===
set SHARE=\\NAS\Documents
set DRIVE=Z:
set TSCMD=C:\Users\YourUserName\AppData\Roaming\npm\tscmd.cmd

set LOGDIR=C:\Scripts\logs
if not exist "%LOGDIR%" mkdir "%LOGDIR%"
set LOGFILE=%LOGDIR%\tagspaces-index.log

REM Scheduled tasks run in their own session, where the mapped
REM drive may not exist yet - re-create the mapping if needed
if not exist %DRIVE%\NUL net use %DRIVE% %SHARE% /persistent:no >> "%LOGFILE%" 2>&1

echo [%date% %time%] Starting index run for %DRIVE% >> "%LOGFILE%"
call "%TSCMD%" indexer --fulltext "%DRIVE%\" >> "%LOGFILE%" 2>&1
echo [%date% %time%] Finished with exit code %errorlevel% >> "%LOGFILE%"

endlocal
Adjust the three variables at the top:
SHARE— the UNC path of your NAS shareDRIVE— the drive letter you mapped in Step 1TSCMD— the full path totscmd.cmdyou noted in Step 3
Remove --fulltext if you only need the metadata index. If you want thumbnails for the share as well, you can add a call "%TSCMD%" thumbgen "%DRIVE%\" line before the final echo.
Test the script once by double-clicking it or running it from a terminal, then check C:\Scripts\logs\tagspaces-index.log for the indexer output.
Mapped network drives belong to your interactive logon session. A scheduled task configured to run whether the user is logged on or not starts in a separate session where Z: does not exist — this is the most common reason why a script that works fine in a terminal fails at night. The net use line in the script re-creates the mapping on demand, using the credentials stored in the Windows Credential Manager in Step 1.
Alternatively, since the index stores relative paths, the script can skip the drive mapping entirely and index the UNC path directly: replace the last four lines with call "%TSCMD%" indexer --fulltext "%SHARE%". If the share requires authentication, keep a net use %SHARE% >nul 2>&1 line before it to connect using the stored credentials.
6.2 Create the scheduled task
- Press Win+R, type
taskschd.mscand press Enter to open the Task Scheduler - In the right-hand Actions panel, click Create Basic Task…
- Name:
TagSpaces nightly index, optionally add a description → Next - Trigger: choose Daily → Next, then set the start time to 1:00:00 AM and Recur every 1 days → Next
- Action: choose Start a program → Next
- Program/script:
C:\Scripts\tagspaces-index.cmd - Start in (optional):
C:\Scripts
- Program/script:
- Check Open the Properties dialog for this task when I click Finish and click Finish
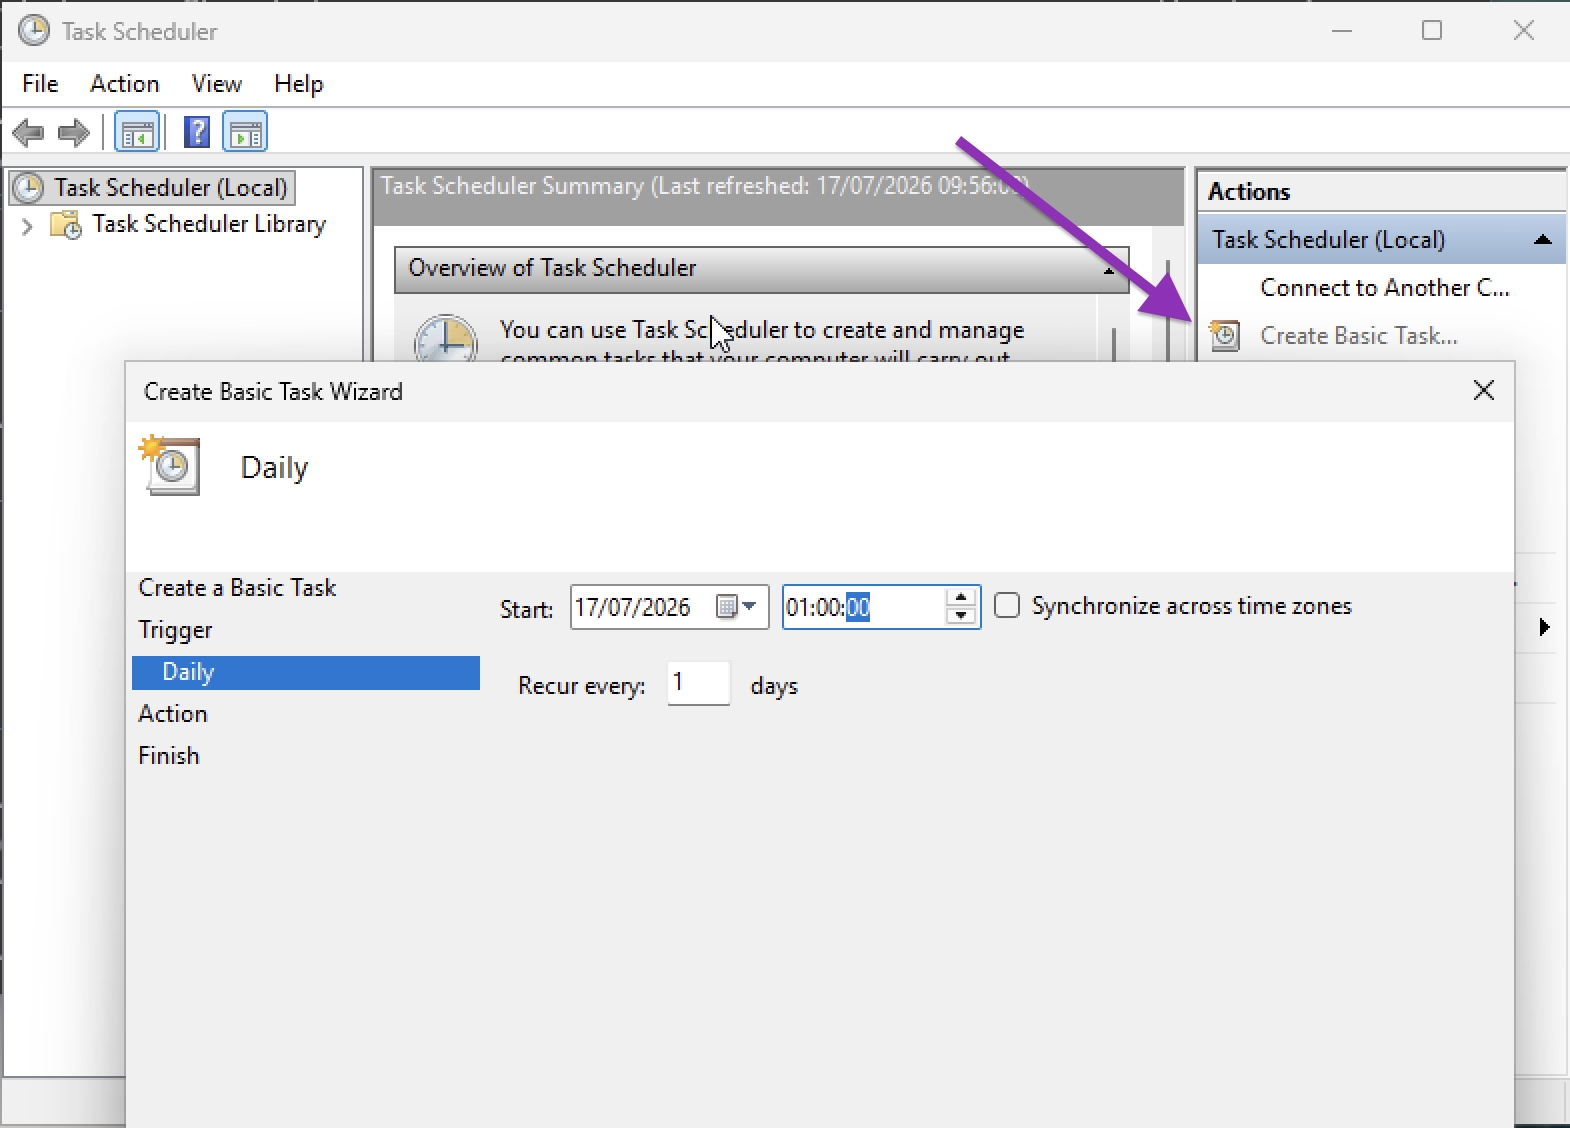
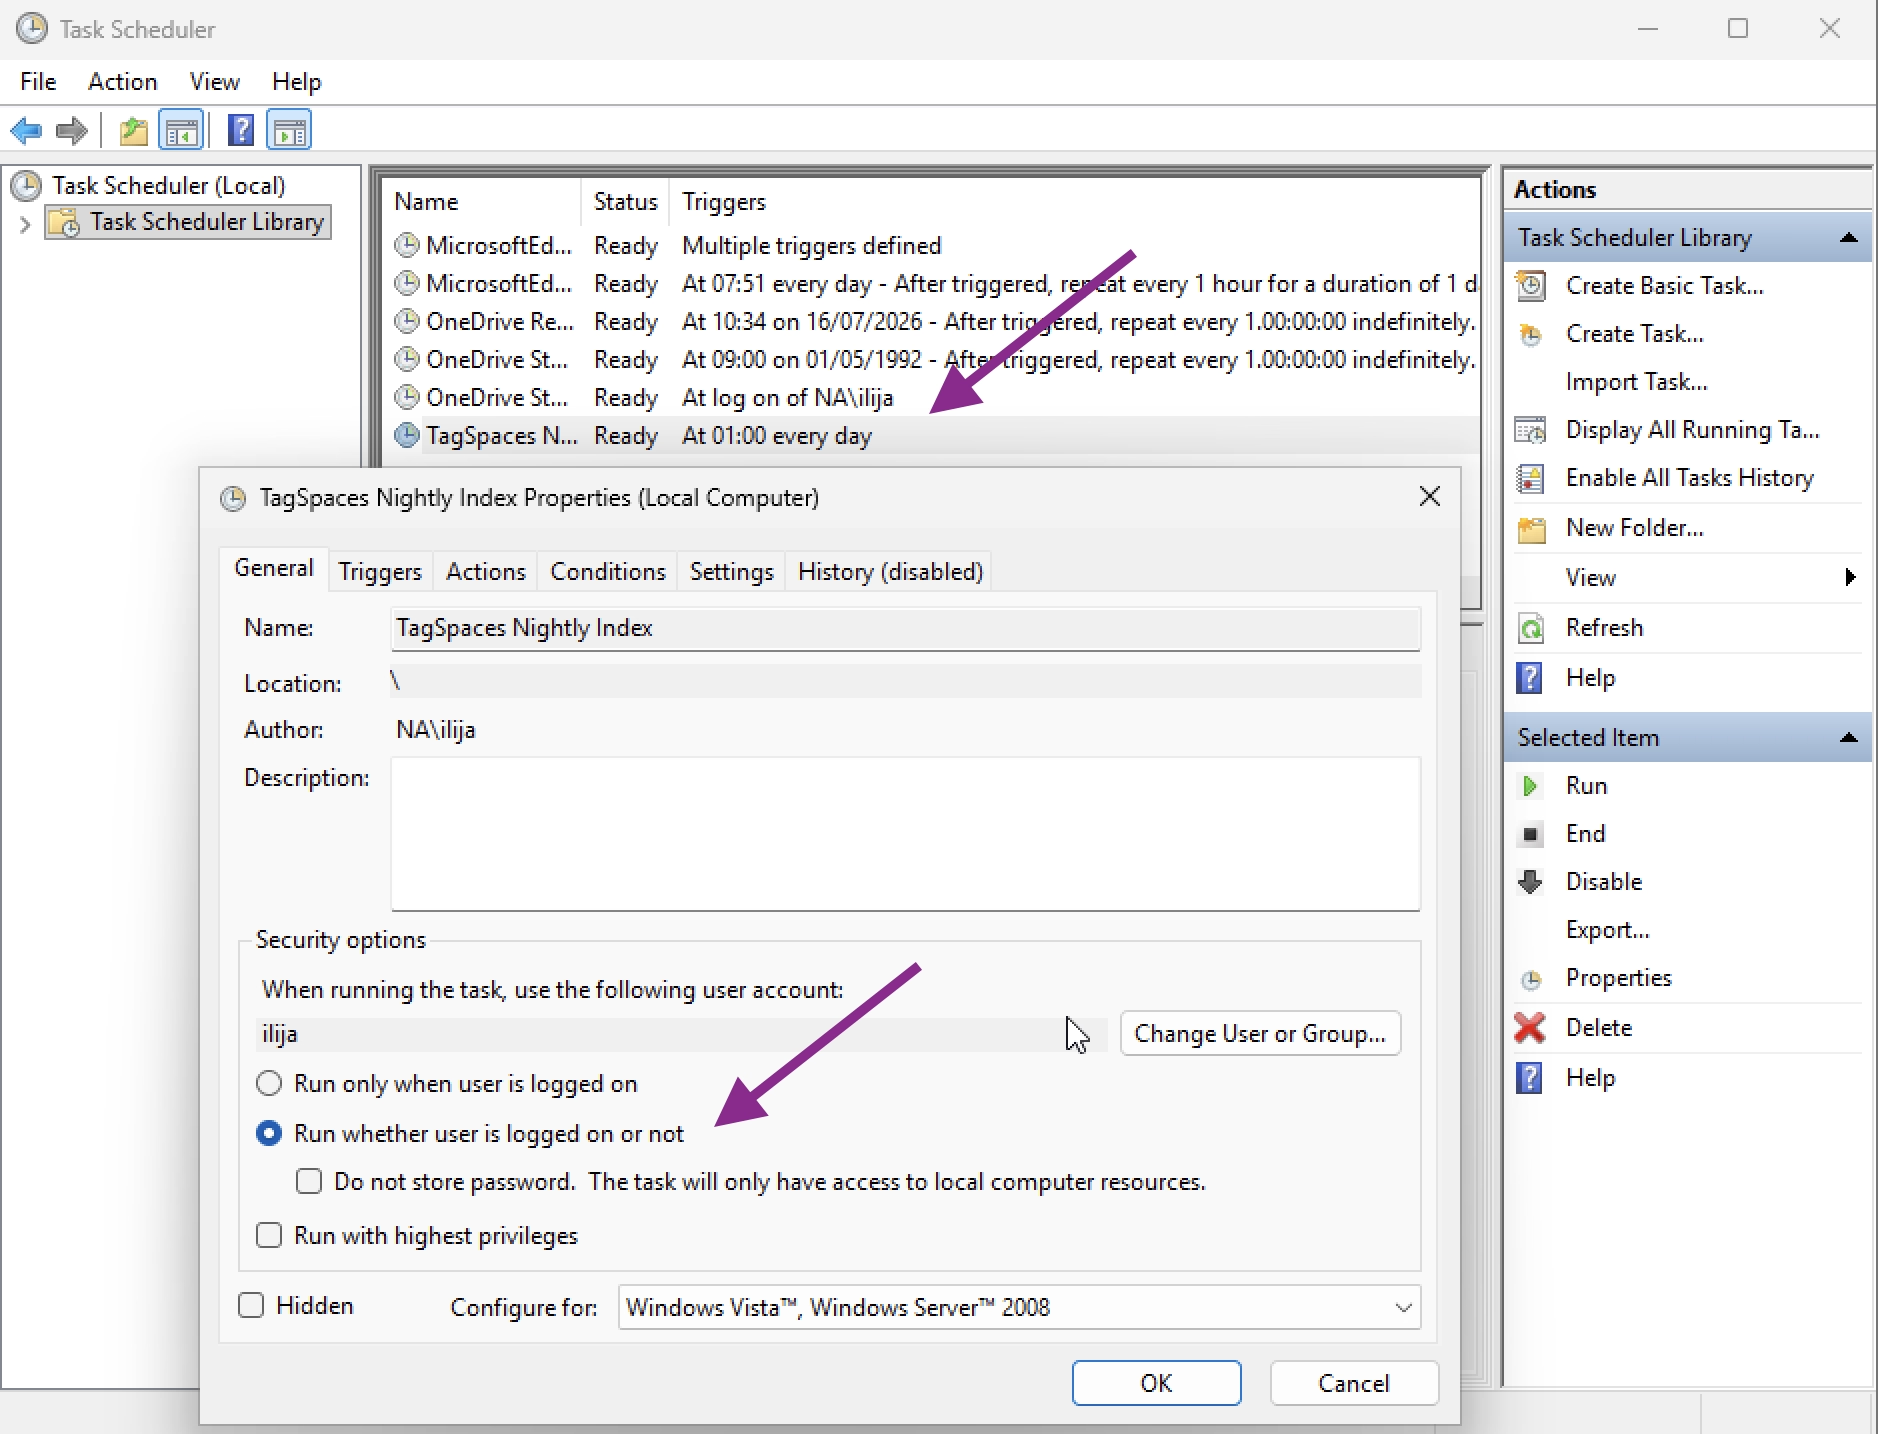
In the Properties dialog that opens, fine-tune the task:
- On the General tab select Run whether user is logged on or not, so the index is refreshed even when you are not signed in. Windows will ask for your account password when saving — it needs it to start the task in the background.
- On the Settings tab enable Run task as soon as possible after a scheduled start is missed, so a night when the computer was off does not leave the index stale.
- On the Conditions tab, enable Wake the computer to run this task if the machine usually sleeps at night, and review the power options if you are on a laptop.
6.3 Alternative: create the task from the command line
If you prefer the terminal, the same task can be created with a single schtasks command from an elevated Command Prompt:
schtasks /create /tn "TagSpaces nightly index" ^
  /tr "C:\Scripts\tagspaces-index.cmd" ^
  /sc daily /st 01:00 ^
  /ru "%USERNAME%" /rp
The /rp flag makes schtasks prompt for your password, which is required to run the task while you are logged off.
Step 7 — Test and verify
Don't wait until 1 AM to find out whether it works:
- In the Task Scheduler library, right-click TagSpaces nightly index → Run
- Wait until the Last Run Result column shows
0x0(success) — press F5 to refresh - Open
C:\Scripts\logs\tagspaces-index.logand check the indexer summary line, e.g.incremental: +3 ~1 -2 =12471 - Check that the timestamp of
Z:\.ts\tsi.jsonwas just updated - Open the location in TagSpaces and run a search — the results now come from the freshly built index
You can also query the index directly from the terminal, without starting TagSpaces:
tscmd search "Z:\" -q "invoice +finance"
Troubleshooting
- The task works when you are logged in, but fails at night — almost always the mapped-drive issue described in Step 6.1. Make sure the script maps the drive itself via
net use, and that the NAS credentials are stored in the Windows Credential Manager (runcmdkey /add:NAS /user:youruser /passonce to store them manually). tscmdis not recognized inside the task — the scheduled task does not use your userPATH. Always calltscmd.cmdby its full path in the script, as shown above.- Last Run Result is not
0x0— check the log file first; the exit code oftscmdis written there.0x1typically means the script itself failed (wrong paths),0x2that the script file was not found. - Indexing takes very long every night — the runs should be incremental after the first one. If every run re-indexes everything, check whether a backup or sync tool touches the modification times of all files on the share.
- TagSpaces still indexes the location itself — verify that the Disable Indexing option is enabled in the location properties and that you are running TagSpaces Pro.
Next steps
- Explore all
tscmdcommands — tagging, descriptions, thumbnails, metadata cleanup — in the Command Line Tools documentation - Learn about the search syntax and full-text search in the Search documentation
- Read more about location options such as Disable Indexing in the Locations documentation